Chapter 2: Documentation
Once you install Docusaurus, you can focus entirely on your documentation tasks. The docs folder contains all the documentation published on your Docusaurus site. Simply add your document files to this folder to get started.
Create Documentation from Scratch
By default, Docusaurus supports Markdown files (.md extension). You can also use .mdx files, which are Markdown files that can embed JSX code. While Markdown supports other file formats, these require additional plugin configuration.
To add content to your Docusaurus site, write your documentation in a text editor like Notepad++ (Windows) or BBEdit (macOS), and save the files as .md in the docs folder.
New to Markdown? Google Docs to the Rescue
If you’re unfamiliar with Markdown syntax, you can draft your content in Google Docs using plain English without worrying about formatting. Google Docs lets you export documents as Markdown files:
- Go to File > Download > Markdown (.md).
Keep in mind the following when exporting from Google Docs:
-
Exporting many files as Markdown can be time-consuming, as each file must be exported manually.
-
Google Docs does not support admonitions (callouts like Info, Warning, etc.) directly, although Markdown does. You will need to add these manually after exporting your documents. Learn more about using admonitions in Markdown.
-
Code blocks in Google Docs export as Markdown code blocks, but the "copy" button (which appears on hover in Docusaurus) will not be displayed by default. To enable this feature, you must manually format the code blocks. Learn more about formatting code blocks.
-
Google Docs supports collapsible sections only in pageless mode. However, collapsible sections will not render on your Docusaurus site if exported as is. To enable collapsible content, you need to manually wrap it in the following HTML tags:
<details>
  <summary>Title</summary>
  Content under the collapsible section.
</details>
The <summary> tag is optional. If omitted, the label "details" appears when the section is collapsed. If included, the text inside <summary> will be shown instead (e.g., “Collapsible Section”).
Use Existing Documentation
If your documentation is already hosted on a portal and you want to see how it looks in Docusaurus, you can export your docs project as Markdown. Most documentation tools offer an option to export your content in Markdown format.
If Markdown export isn’t available, you can export your project in other formats like HTML, PDF, or CHM, and then use AI tools to convert those files to Markdown. Once your documentation is in Markdown format, simply move the files to the docs folder in your Docusaurus project.
Configure Sidebar
The sidebar is the table of contents displayed on the left side of your documentation site.
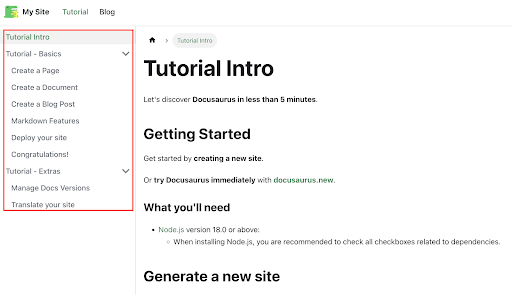
All the files in the docs folder are automatically listed in the sidebar. Files located inside folders appear under collapsible sections. For example, in the image above, Tutorial - Basics is a subfolder within the docs folder. This sidebar is auto-generated by Docusaurus, but you can customize it by overriding with your own code to change its appearance and behavior.
Set File and Folder Order in Sidebar
After adding your Markdown files to the docs folder, you can remove the default files and folders created by Docusaurus. To control the order in which files and folders appear in the sidebar, follow the steps below.
Assume your docs folder has the following structure:
-
Introduction (Markdown file)
-
Installation (Markdown file)
-
Create Record (Markdown file)
-
Advanced Topics (folder containing files)
To display your documentation in this exact order, you need to perform specific configurations.
Set File Order
Add the following frontmatter syntax at the top of each Markdown file to control its order in the sidebar:
---
title: <file_title>

sidebar_position: <order>
---
For example, the Introduction.md file should start with:
---

title: Introduction

sidebar_position: 1

---
-
The text in the
titlefield will appear in the sidebar, regardless of the actual file name or internal document title. -
The
sidebar_positionmust be a unique number among all sibling docs and folders.
Set Folder Order
Similarly, add the frontmatter to other files, adjusting sidebar_position as needed (e.g., 2 for Installation, 3 for Create Record).
For folders, create a JSON file named _category_.json inside the folder, with content like this:
{

  `"label": "Advanced Topics",`

  `"position": 4`

}
-
The
labelvalue is the name displayed in the sidebar, independent of the folder’s actual name. -
To order files inside a folder, apply the same frontmatter
sidebar_positiontechnique to each file within it.
If you don’t see your changes reflected, run:
npm run start
Versioning
One of the key features of Docusaurus is its support for documentation versioning. Versioning allows you to maintain multiple versions of your documentation, each corresponding to a specific release cycle.
To enable versioning on your Docusaurus site, you need to modify the docusaurus.config.js file. The following sections explain the necessary changes.
Enable Versioning
To enable versioning:
-
Open the
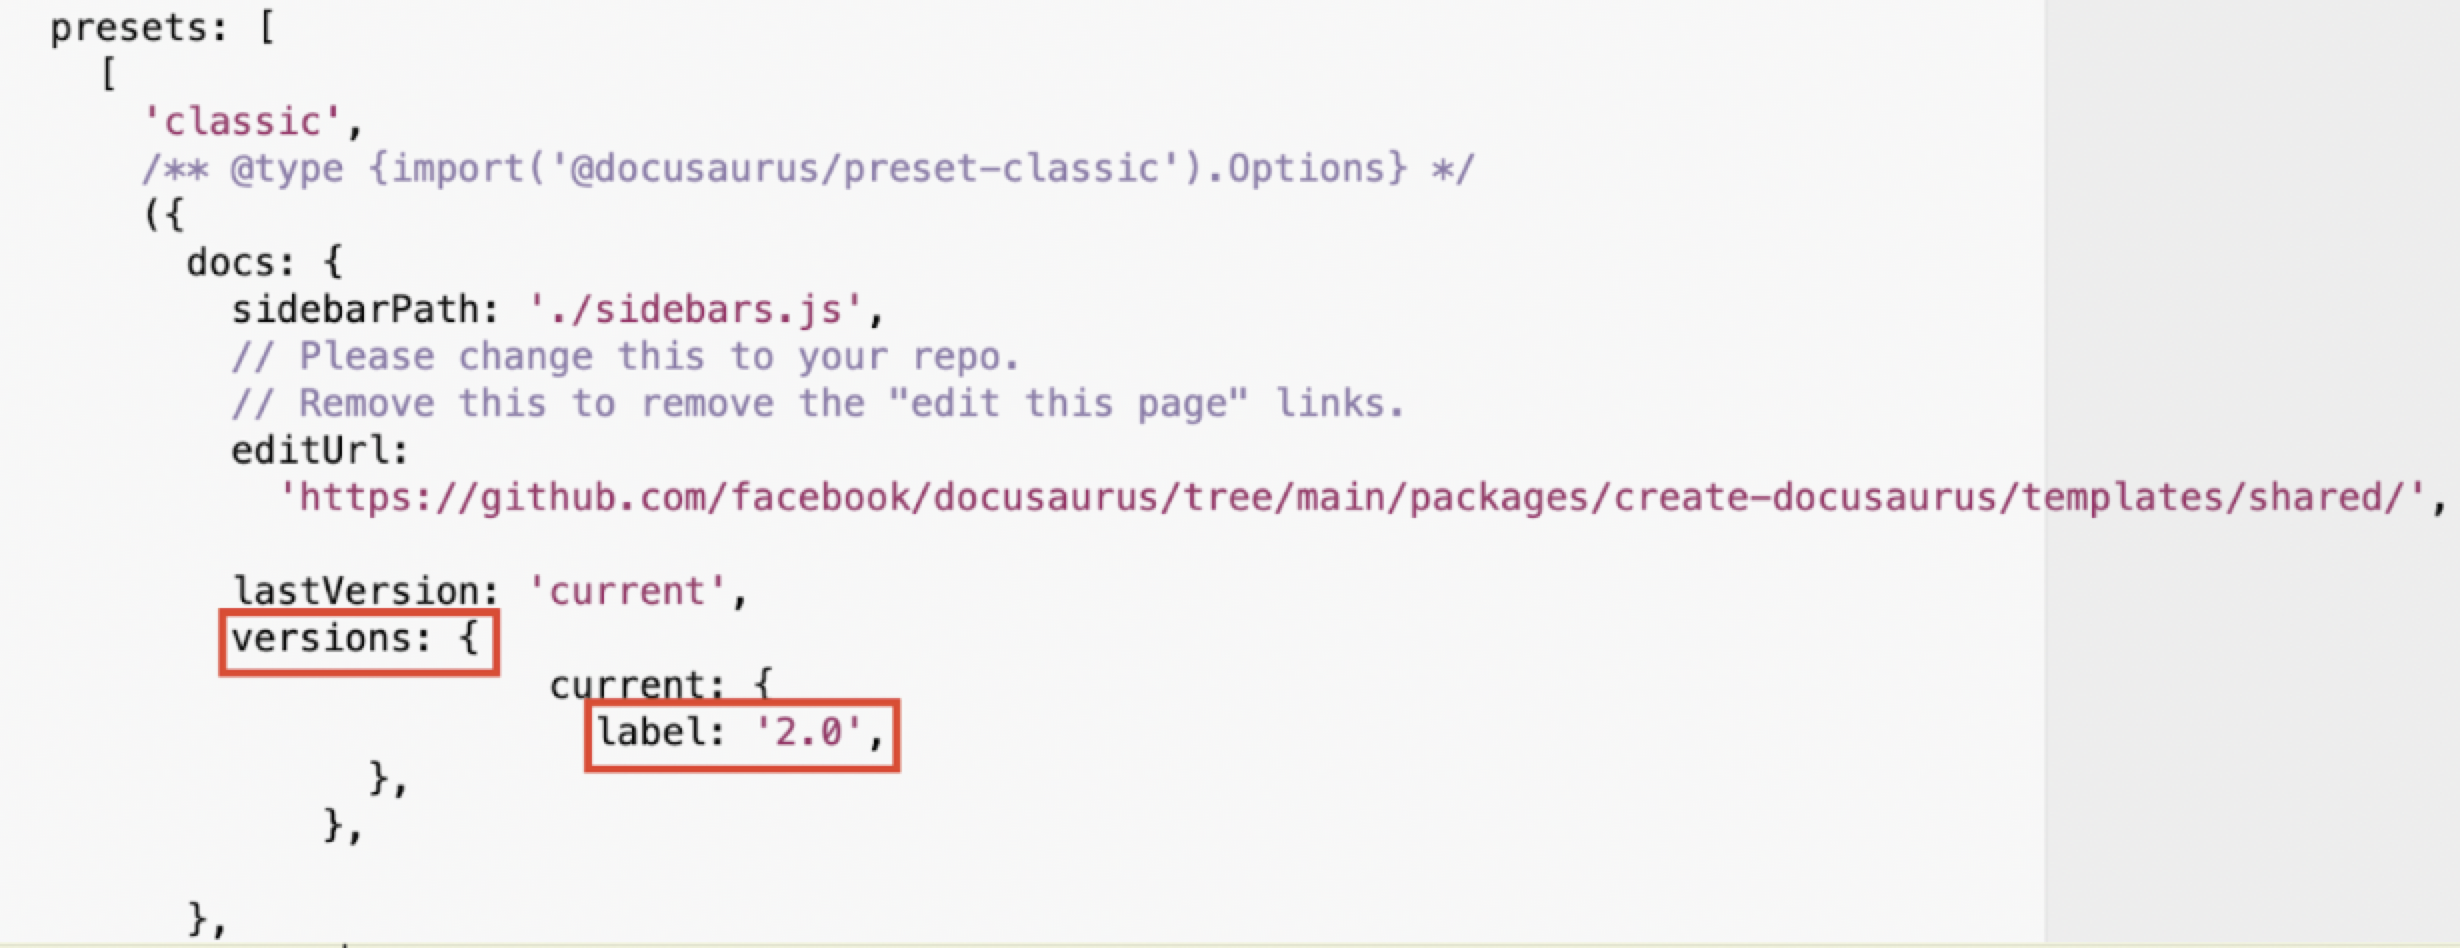
docusaurus.config.jsfile and locate thepresetssection. -
Within the
presetssection, find theeditUrlconfiguration.
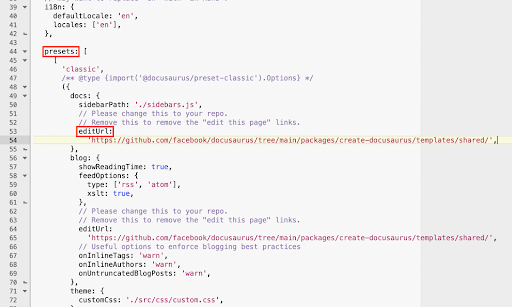
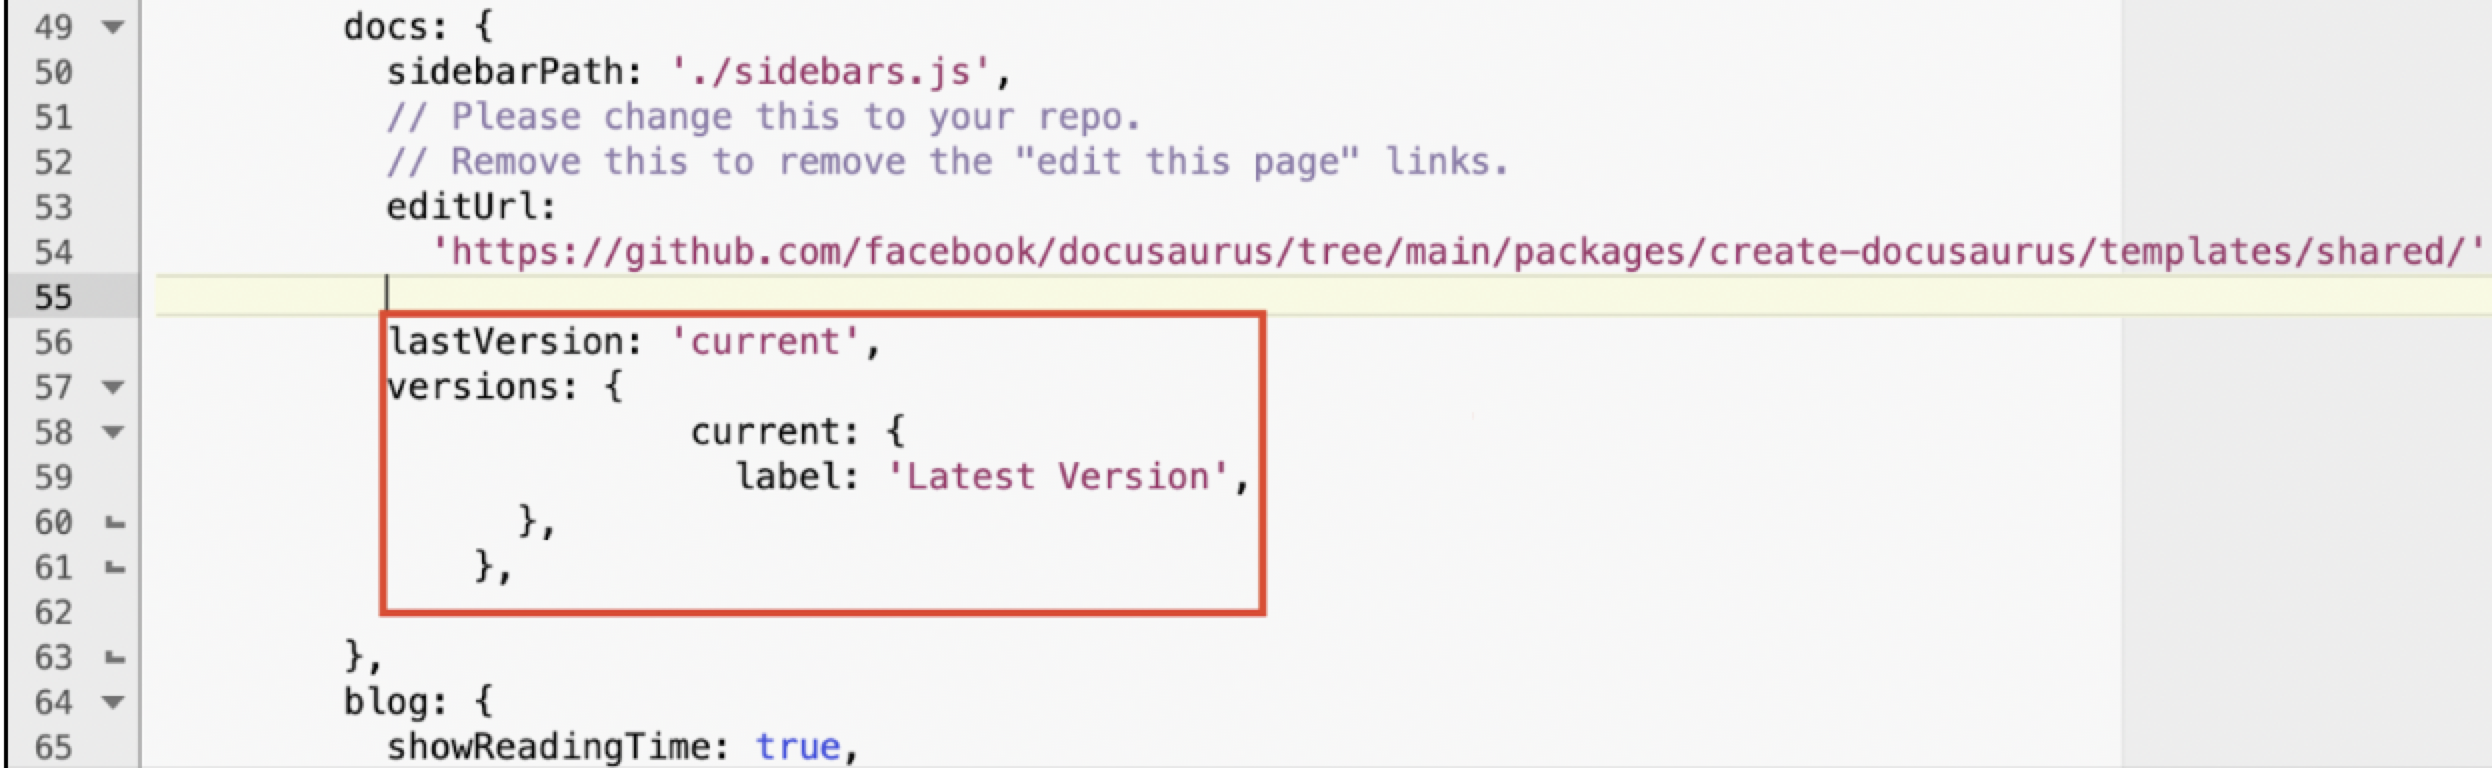
- Add the following code snippet after the URL.
lastVersion: 'current',

versions: {

  current: {

    label: 'Latest Version',

  },

},
-
While pasting the code ensure that the indentation requirements are met; the
latestVersionandversionskeys must be placed at the same level aseditUrl. Basically, all the three keys must exist as siblings under the docs section and not nested within one another. -
In the
labelfield, I have used the word Latest Version. You can replace it with your desired name for the latest version. This name appears on the version drop-down menu.
Enable Version Drop-Down Menu
After enabling versioning, you need to add a drop-down menu that allows users to switch between different versions of your documentation. To do this, make a few modifications to the docusaurus.config.js file. Follow these steps:
-
Locate the
navbarsection within thedocusaurus.config.jsfile. -
Under
navbar, find theitemsarray.
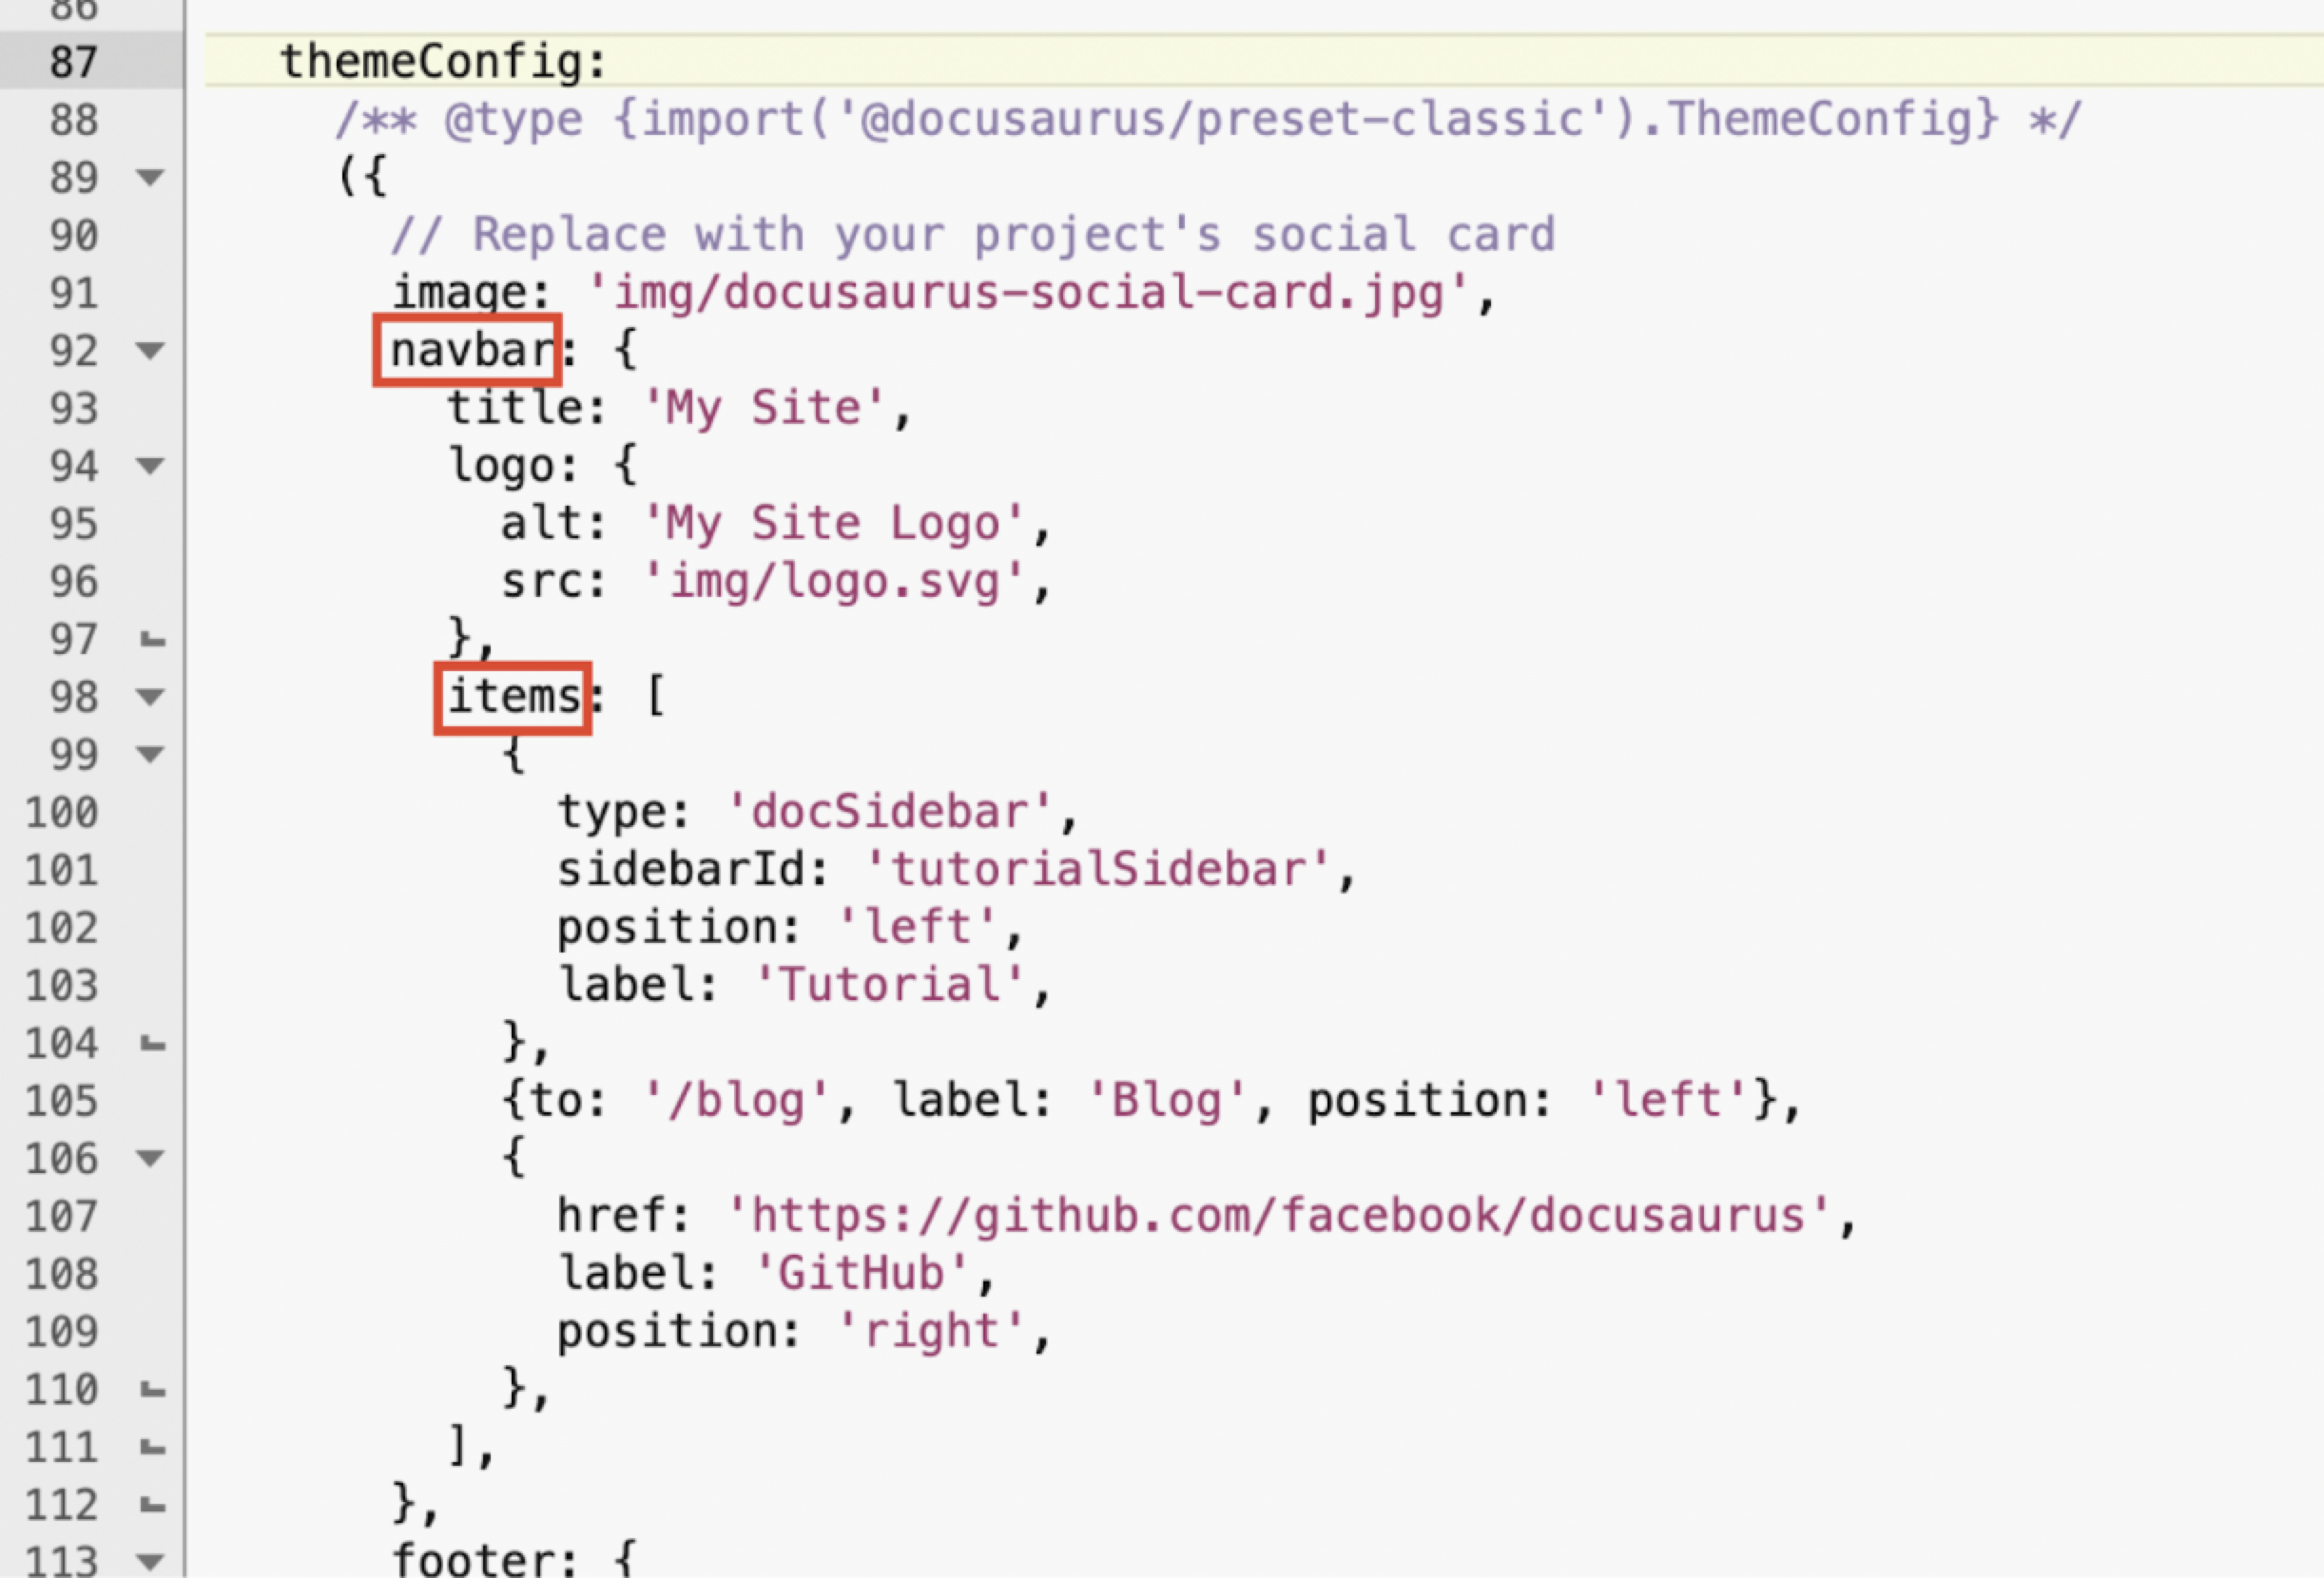
- Under the
itemsarray add the following code snippet.
{

      type: 'docsVersionDropdown',

      position: 'right',

    },
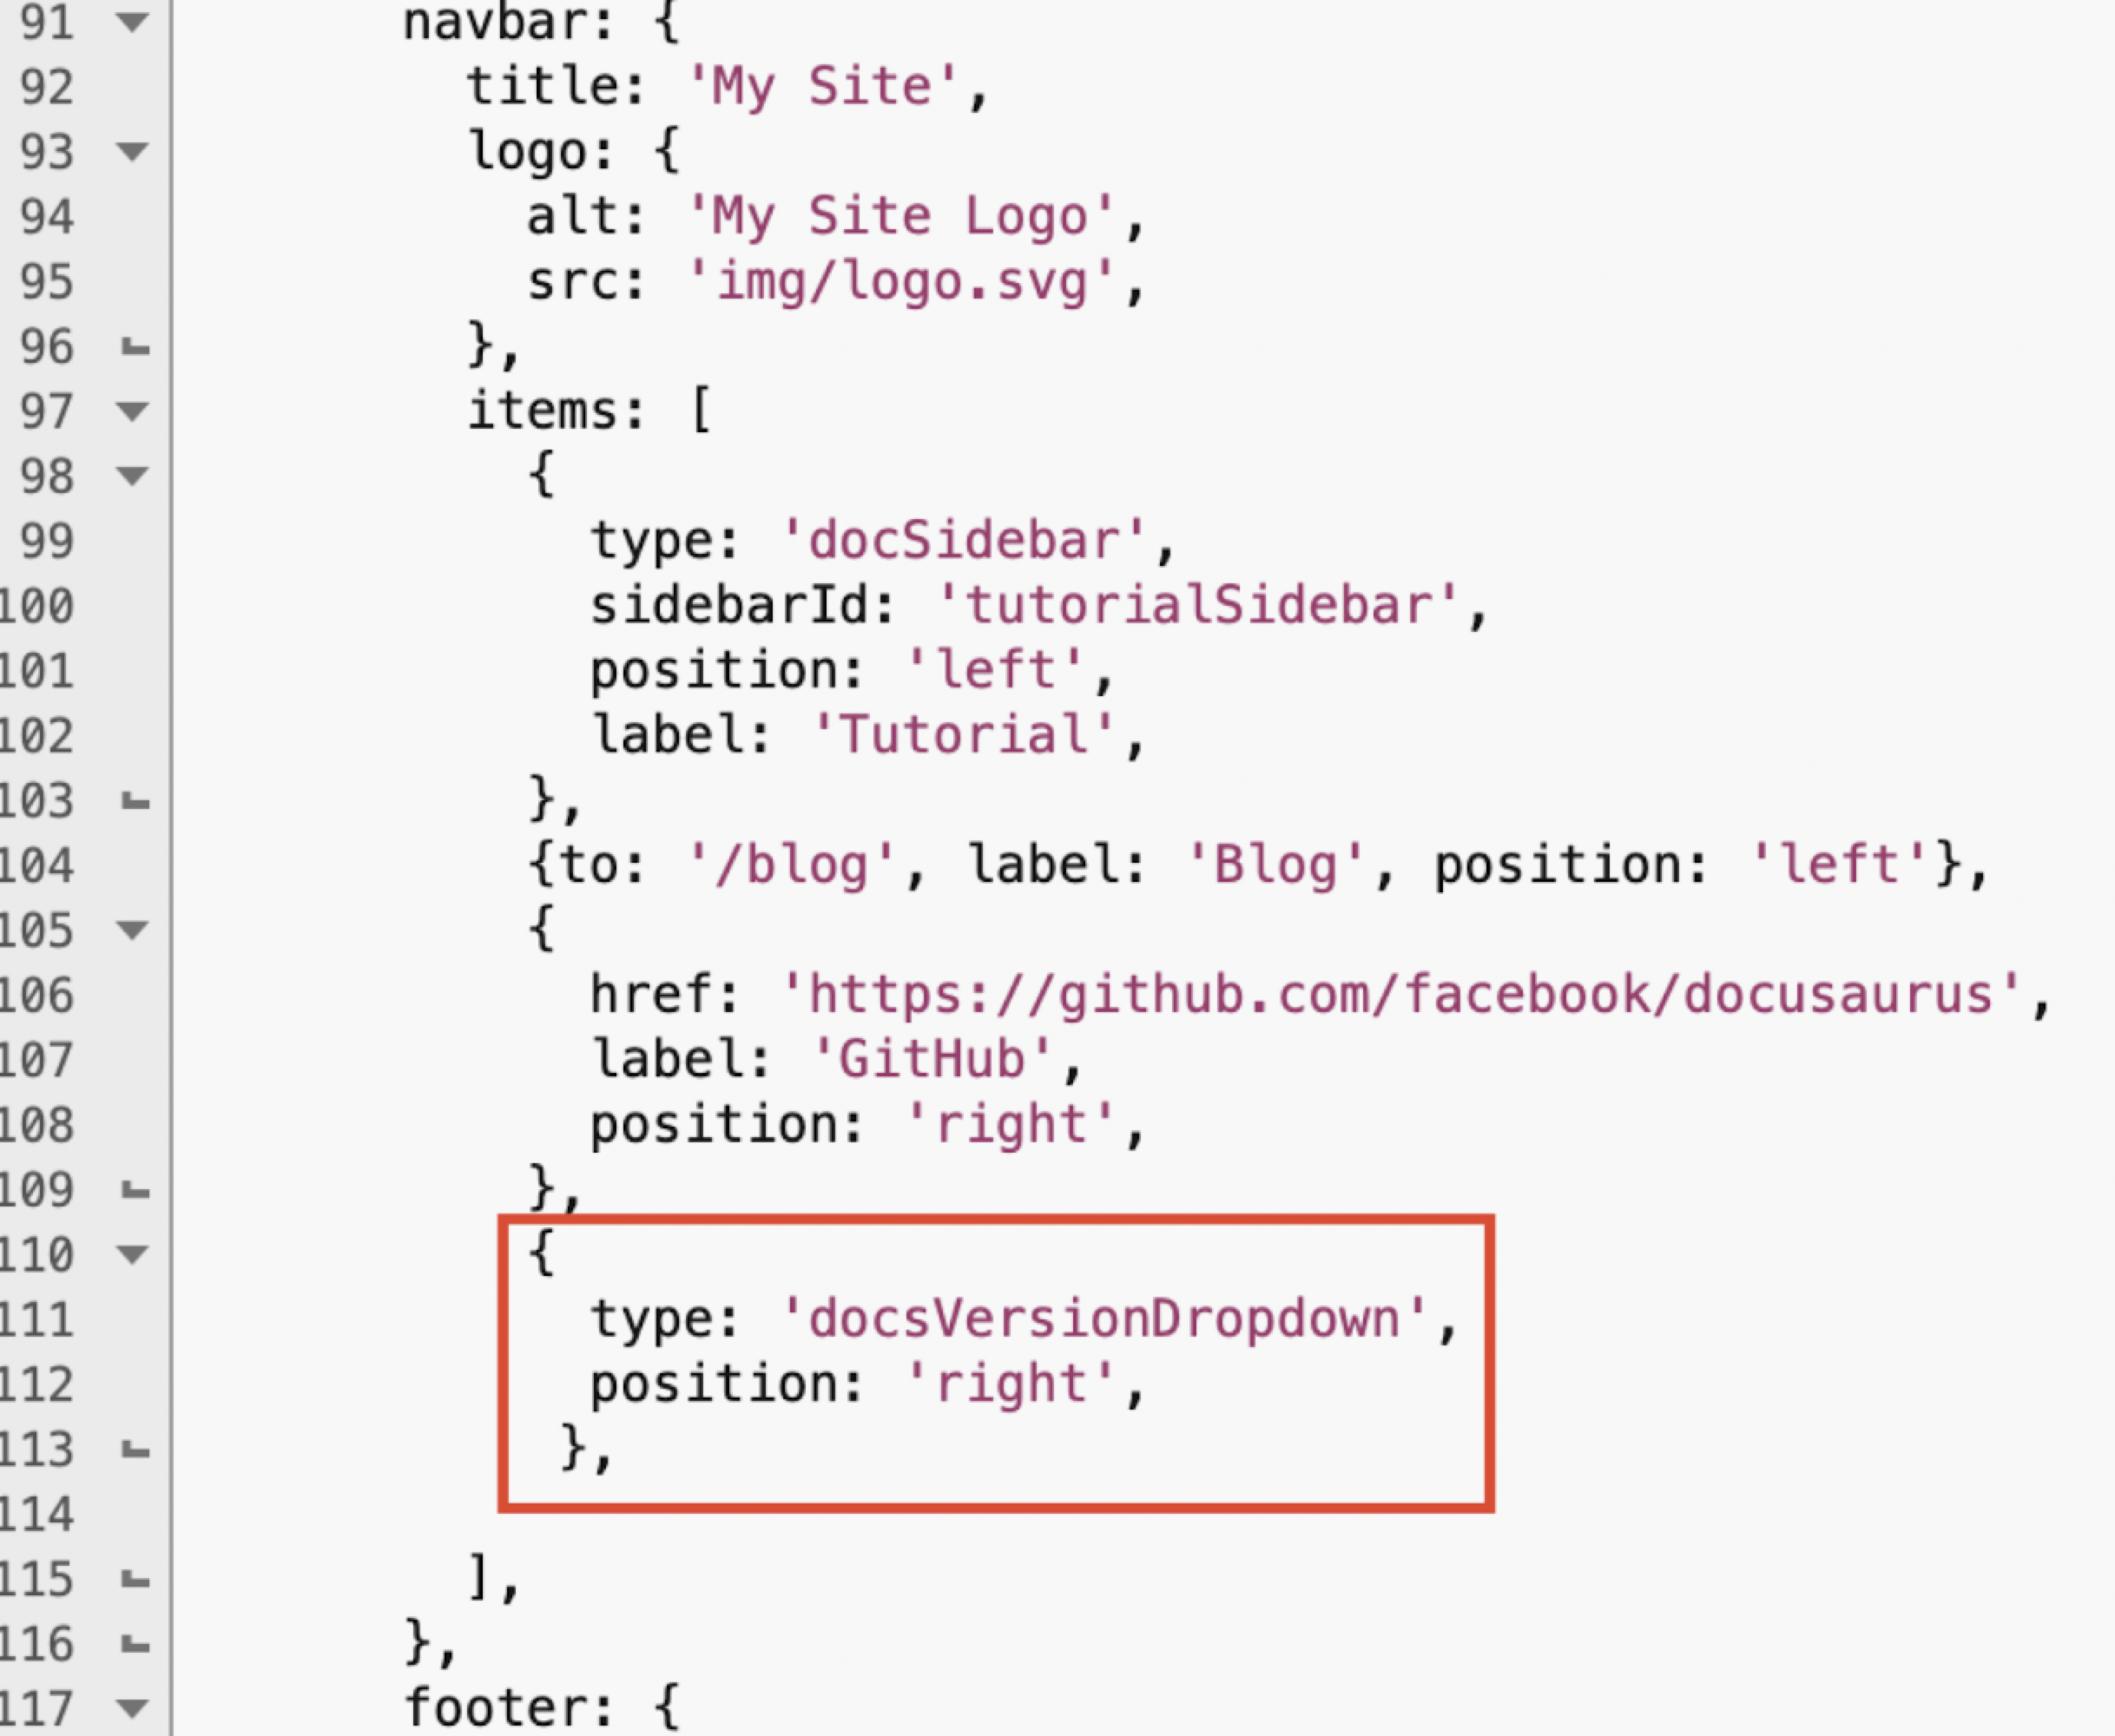
To place the drop-down on the left side of the screen, you can use the word left in the position field.
Create Version Snapshot
Once you enable versioning and create a drop-down menu to select versions, you must create a snapshot of your existing documentation and then run the build command.
- Execute the following command in your terminal.
npm run docusaurus docs: version old-version
-
Instead of old-version, you can use any other name that you wish to assign to your old version. You can use numbers as well. For example, 1.0, 1.0.1, and so on.
-
This command creates a snapshot of all your existing documentation (that resides in the docs folder). This snapshot is stored under a new folder called old-version or whatever name/number you enter while executing the command).
-
You can make the changes to documentation in the docs folder. The content of files under the old-version folder are not affected. However, to modify content from the previous version, you must make changes to the files under the old-version.
- Execute the following command in your terminal to run the build.
npm run build
Create Multiple Versions
In the previous section, we saw how to enable versioning and create two versions of the documentation. In this section, we will go one step further and see how we can maintain multiple versions of docs.
Let’s assume that you have two versions of documentation; 1.0 and 2.0. 2.0 is the latest version and 1.0 is the previous version. You wish to create a new version 3.0 and make version 2.0 also an old version, just like 1.0.
- Execute the following command in your terminal to create a snapshot of 2.0 version documentation.
npm run docusaurus docs: version 2.0
-
In the
docusaurus.config.jsfile, navigate to theversionsection. -
Replace 2.0 with 3.0 under the
labelskey.
- Execute the
npm run buildcommand in your terminal.
Deployment
Once you complete your project configuration, you need to upload it to a hosting site to make it publicly accessible. This allows anyone to access your site using its URL.
There are many hosting providers available; both free and paid. After testing several free options, I found Netlify to be the easiest to use. Netlify also supports custom domains, even on its free plan.
Prerequisite
- Sign up for a free Netlify account.
Site Deployment
-
Open the
docusaurus.config.jsfile. -
In the const config section locate the v4:true section.
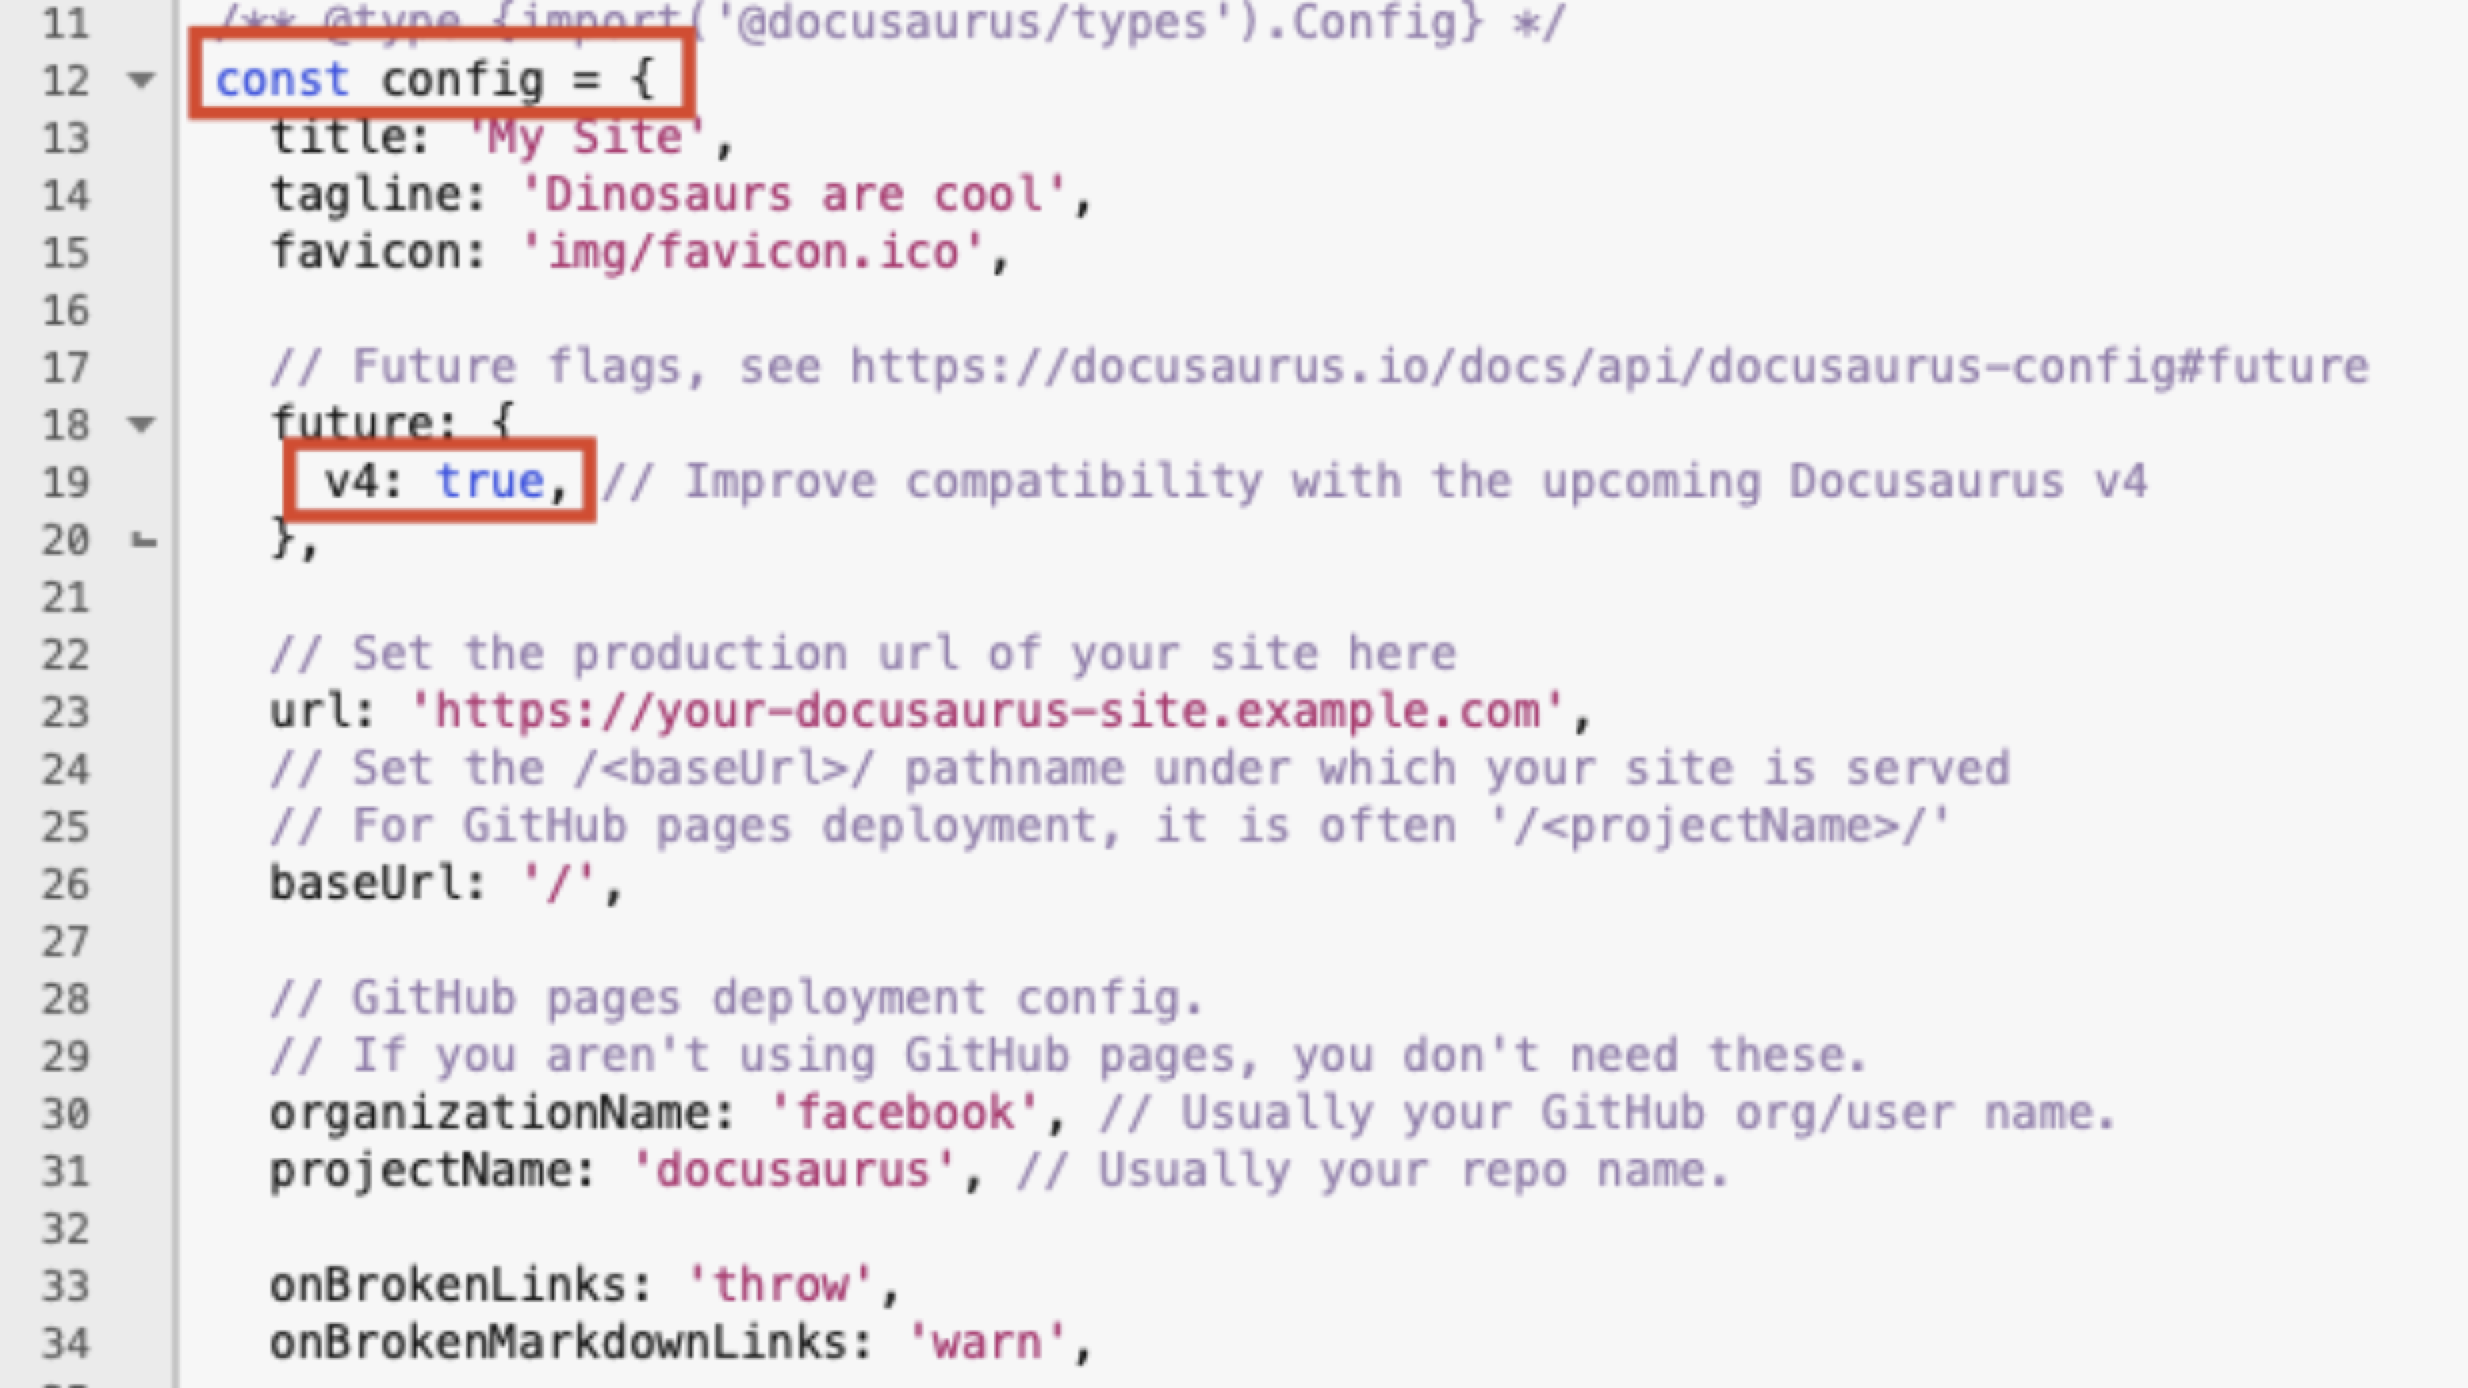
- Add the following data.
   url: '<enter a URL>',

   baseUrl: '/',

   projectName: '<Enter a project name>',

   trailingSlash: false,
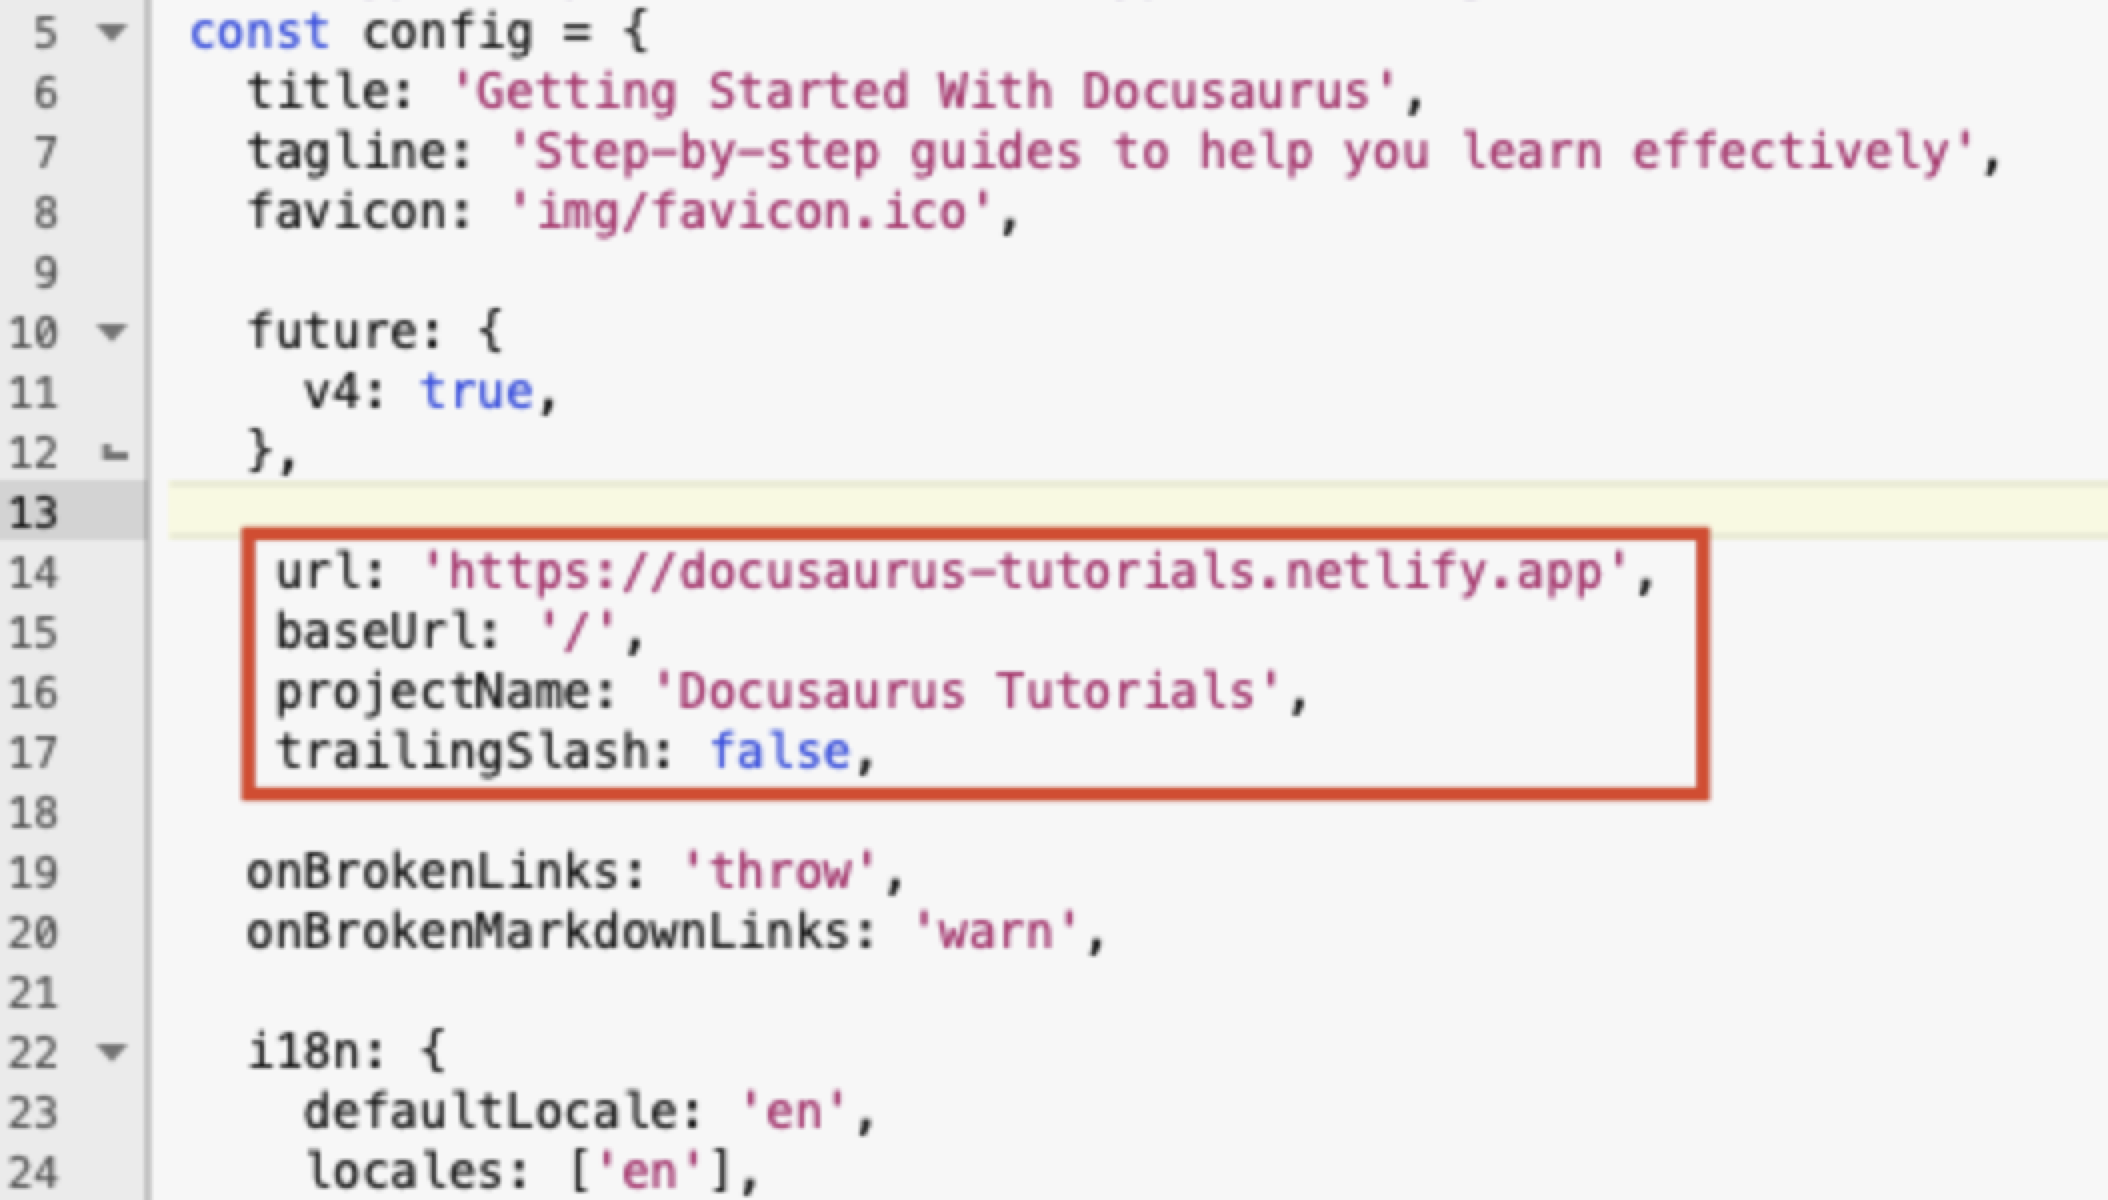
A sample section is as shown below.
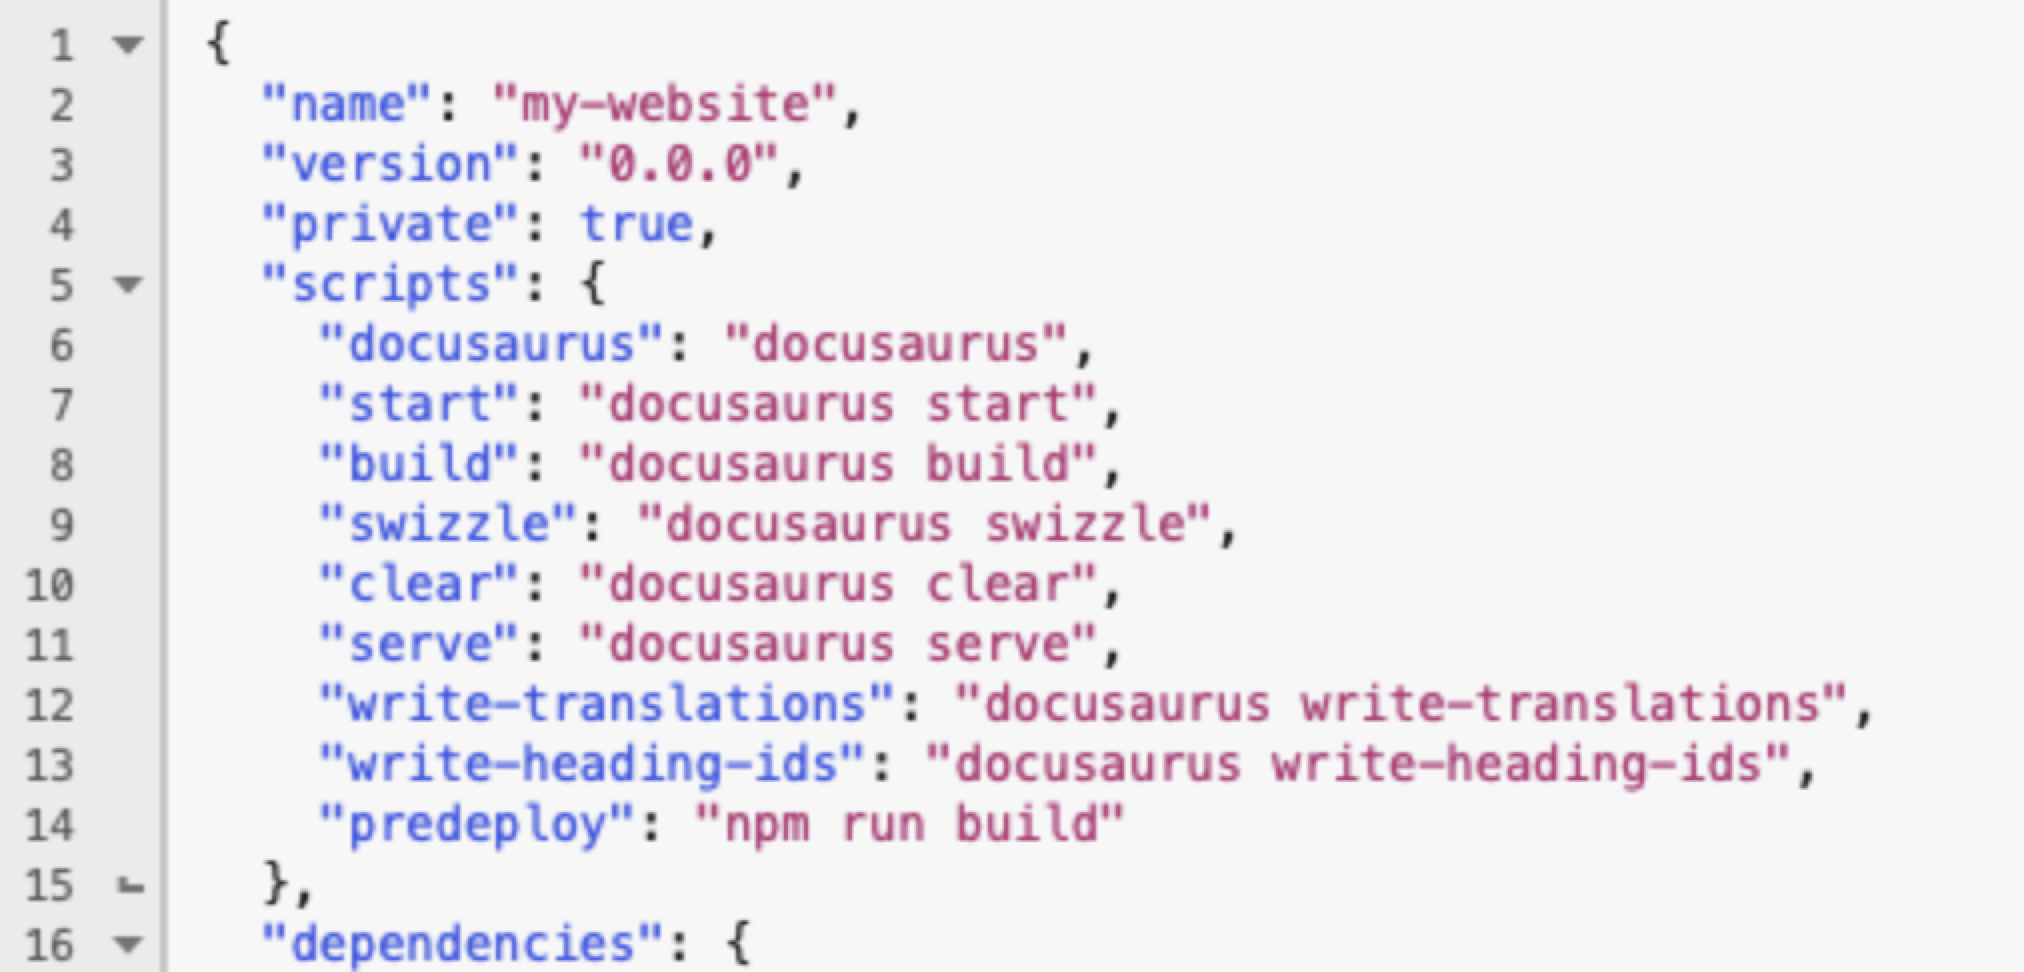
- In the
package.jsonfile, ensure that the following JSON structure is present at the top.
-
Open Command Prompt terminal and navigate to the folder in which your Docusaurus project is present. By default, the Docusaurus project resides in the
<user-name>/my-websitefolder. You need to change your terminal to the my-website folder. -
Execute the following command.
npm run buildThis command creates a new folder called
buildwithin themy-websitefolder.
You must upload this folder to the Netlify app. Move thebuildfolder from themy-websitefolder and place it in some other folder. This is because when you browse thebuildfolder and if it resides inmy-websitefolder, Netlify cannot detect it. -
Log in to your Netlify account.
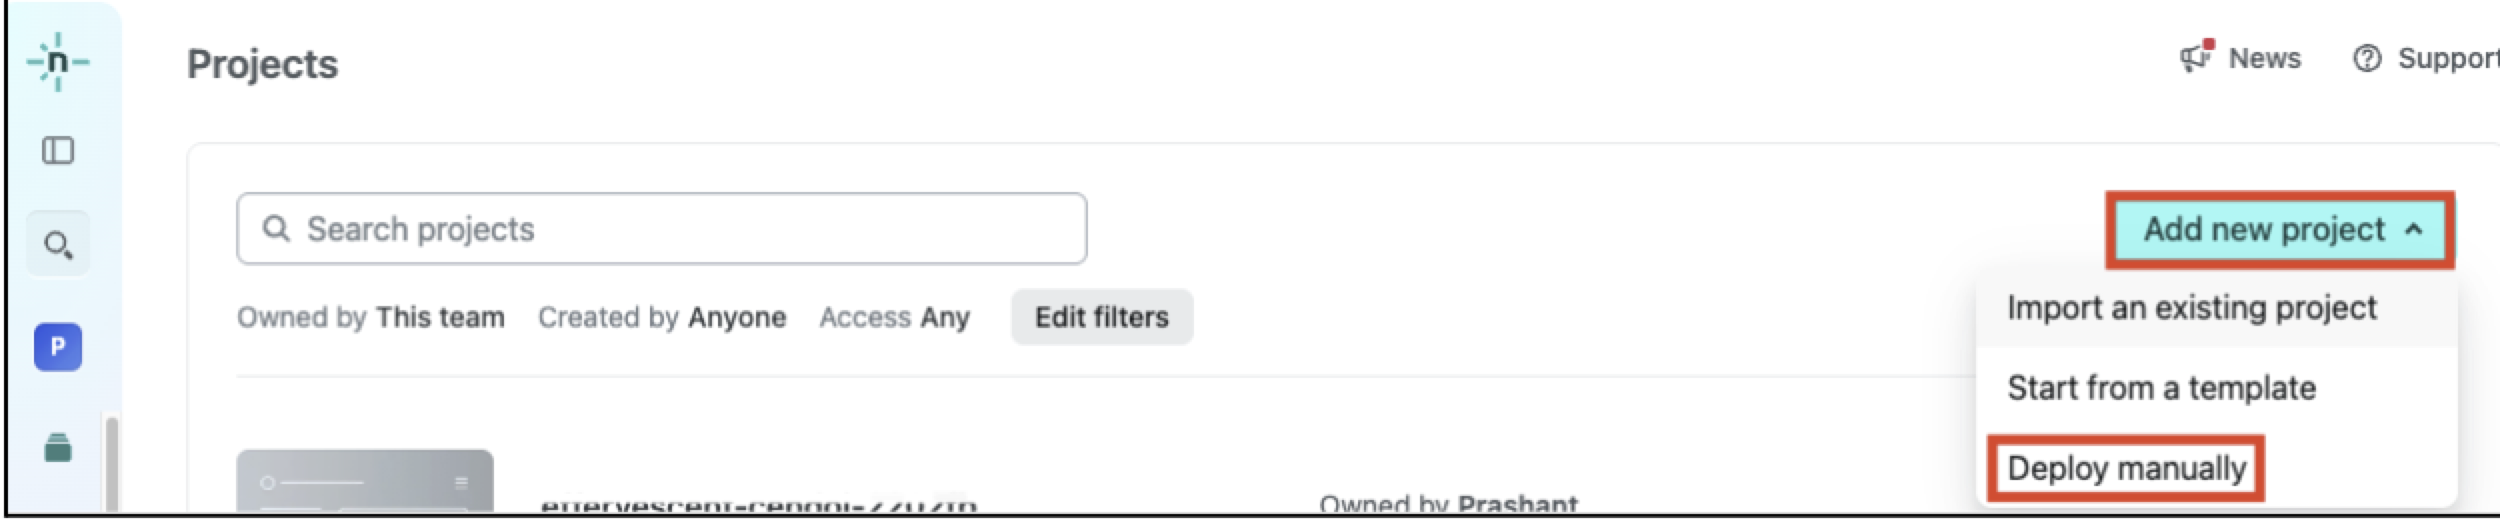
-
Click Add New project and select Deploy manually.
- Browse and upload the
buildfolder created in step 6.
Your site is deployed. Netlify generates a URL as shown below. This URL belongs to the Netlify domain and has a random sub domain. This URL holds your Docusaurus site.
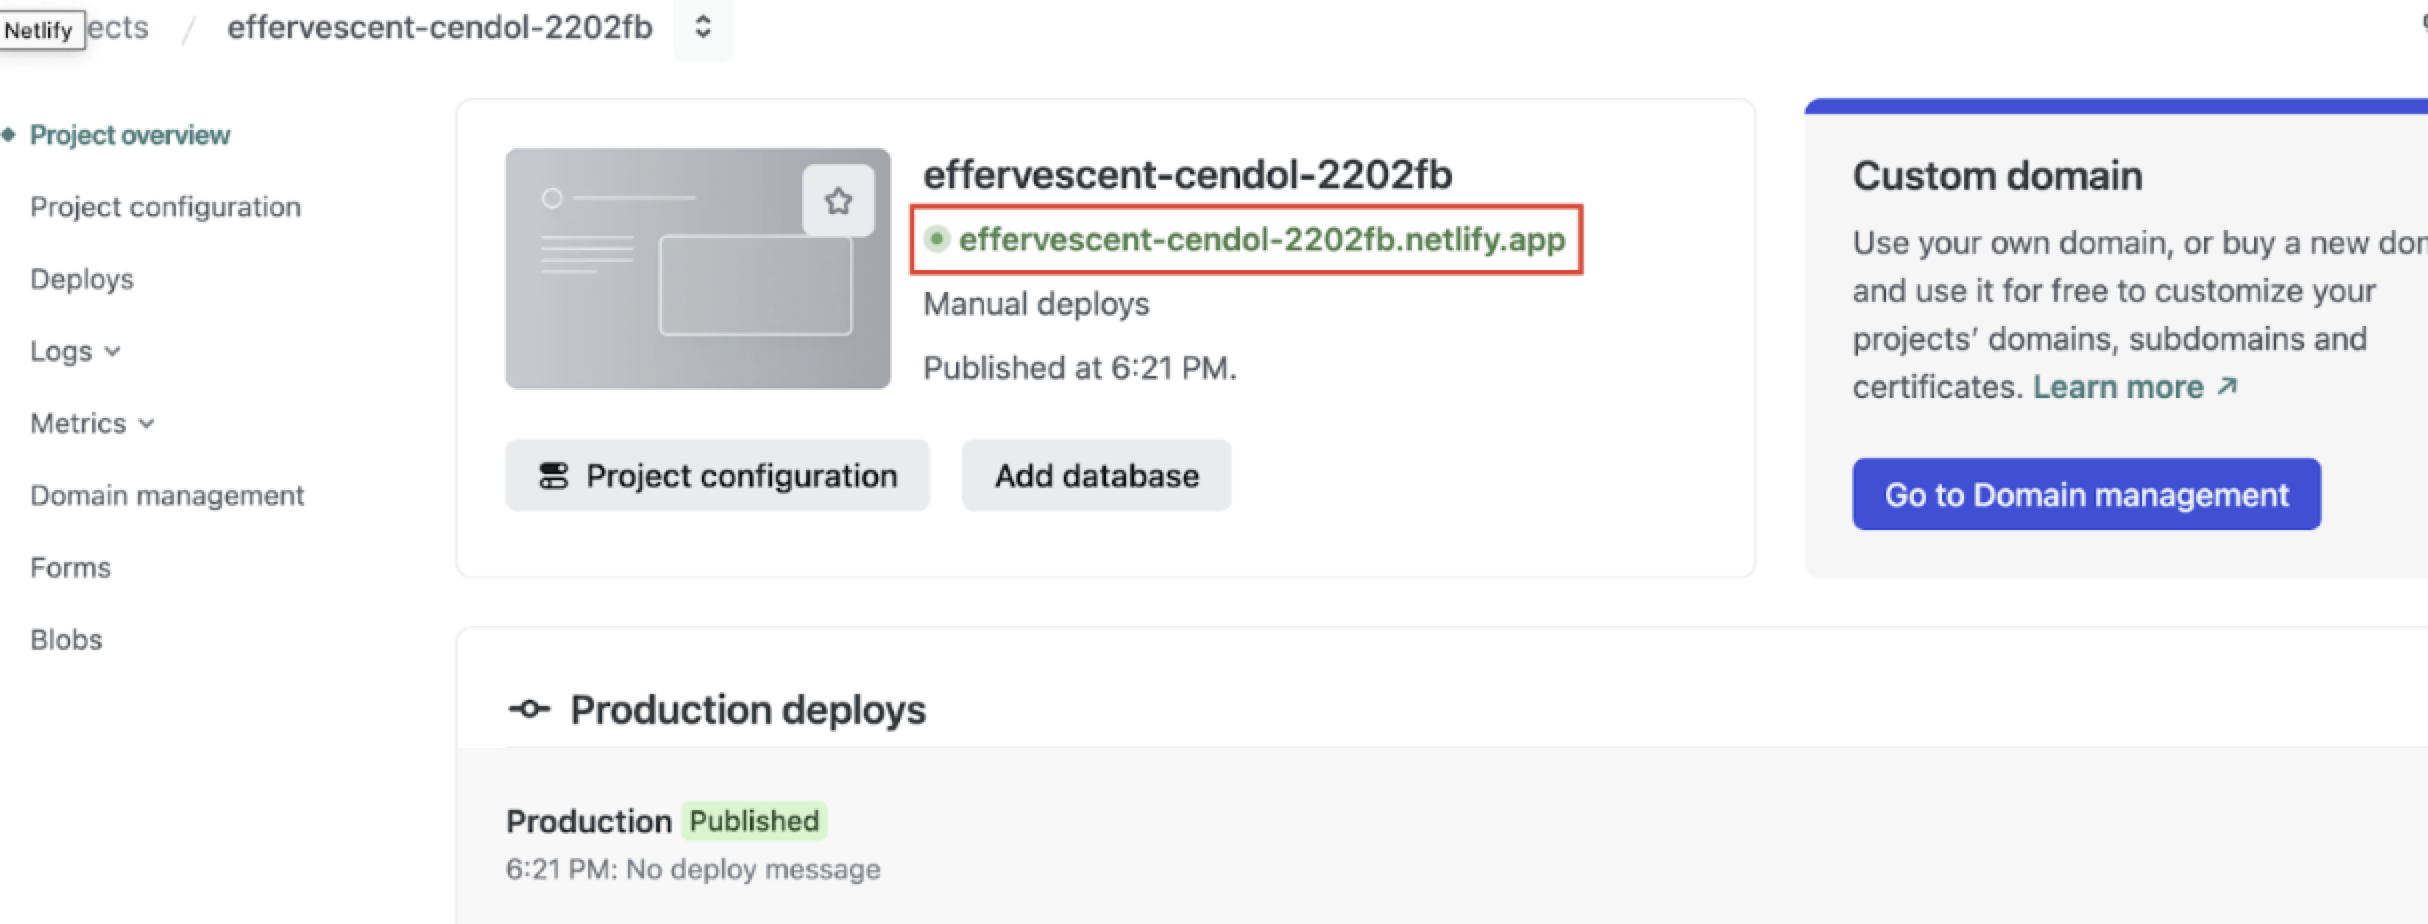
-
To modify the sub domain, click Go to Domain management under Custom domain.
-
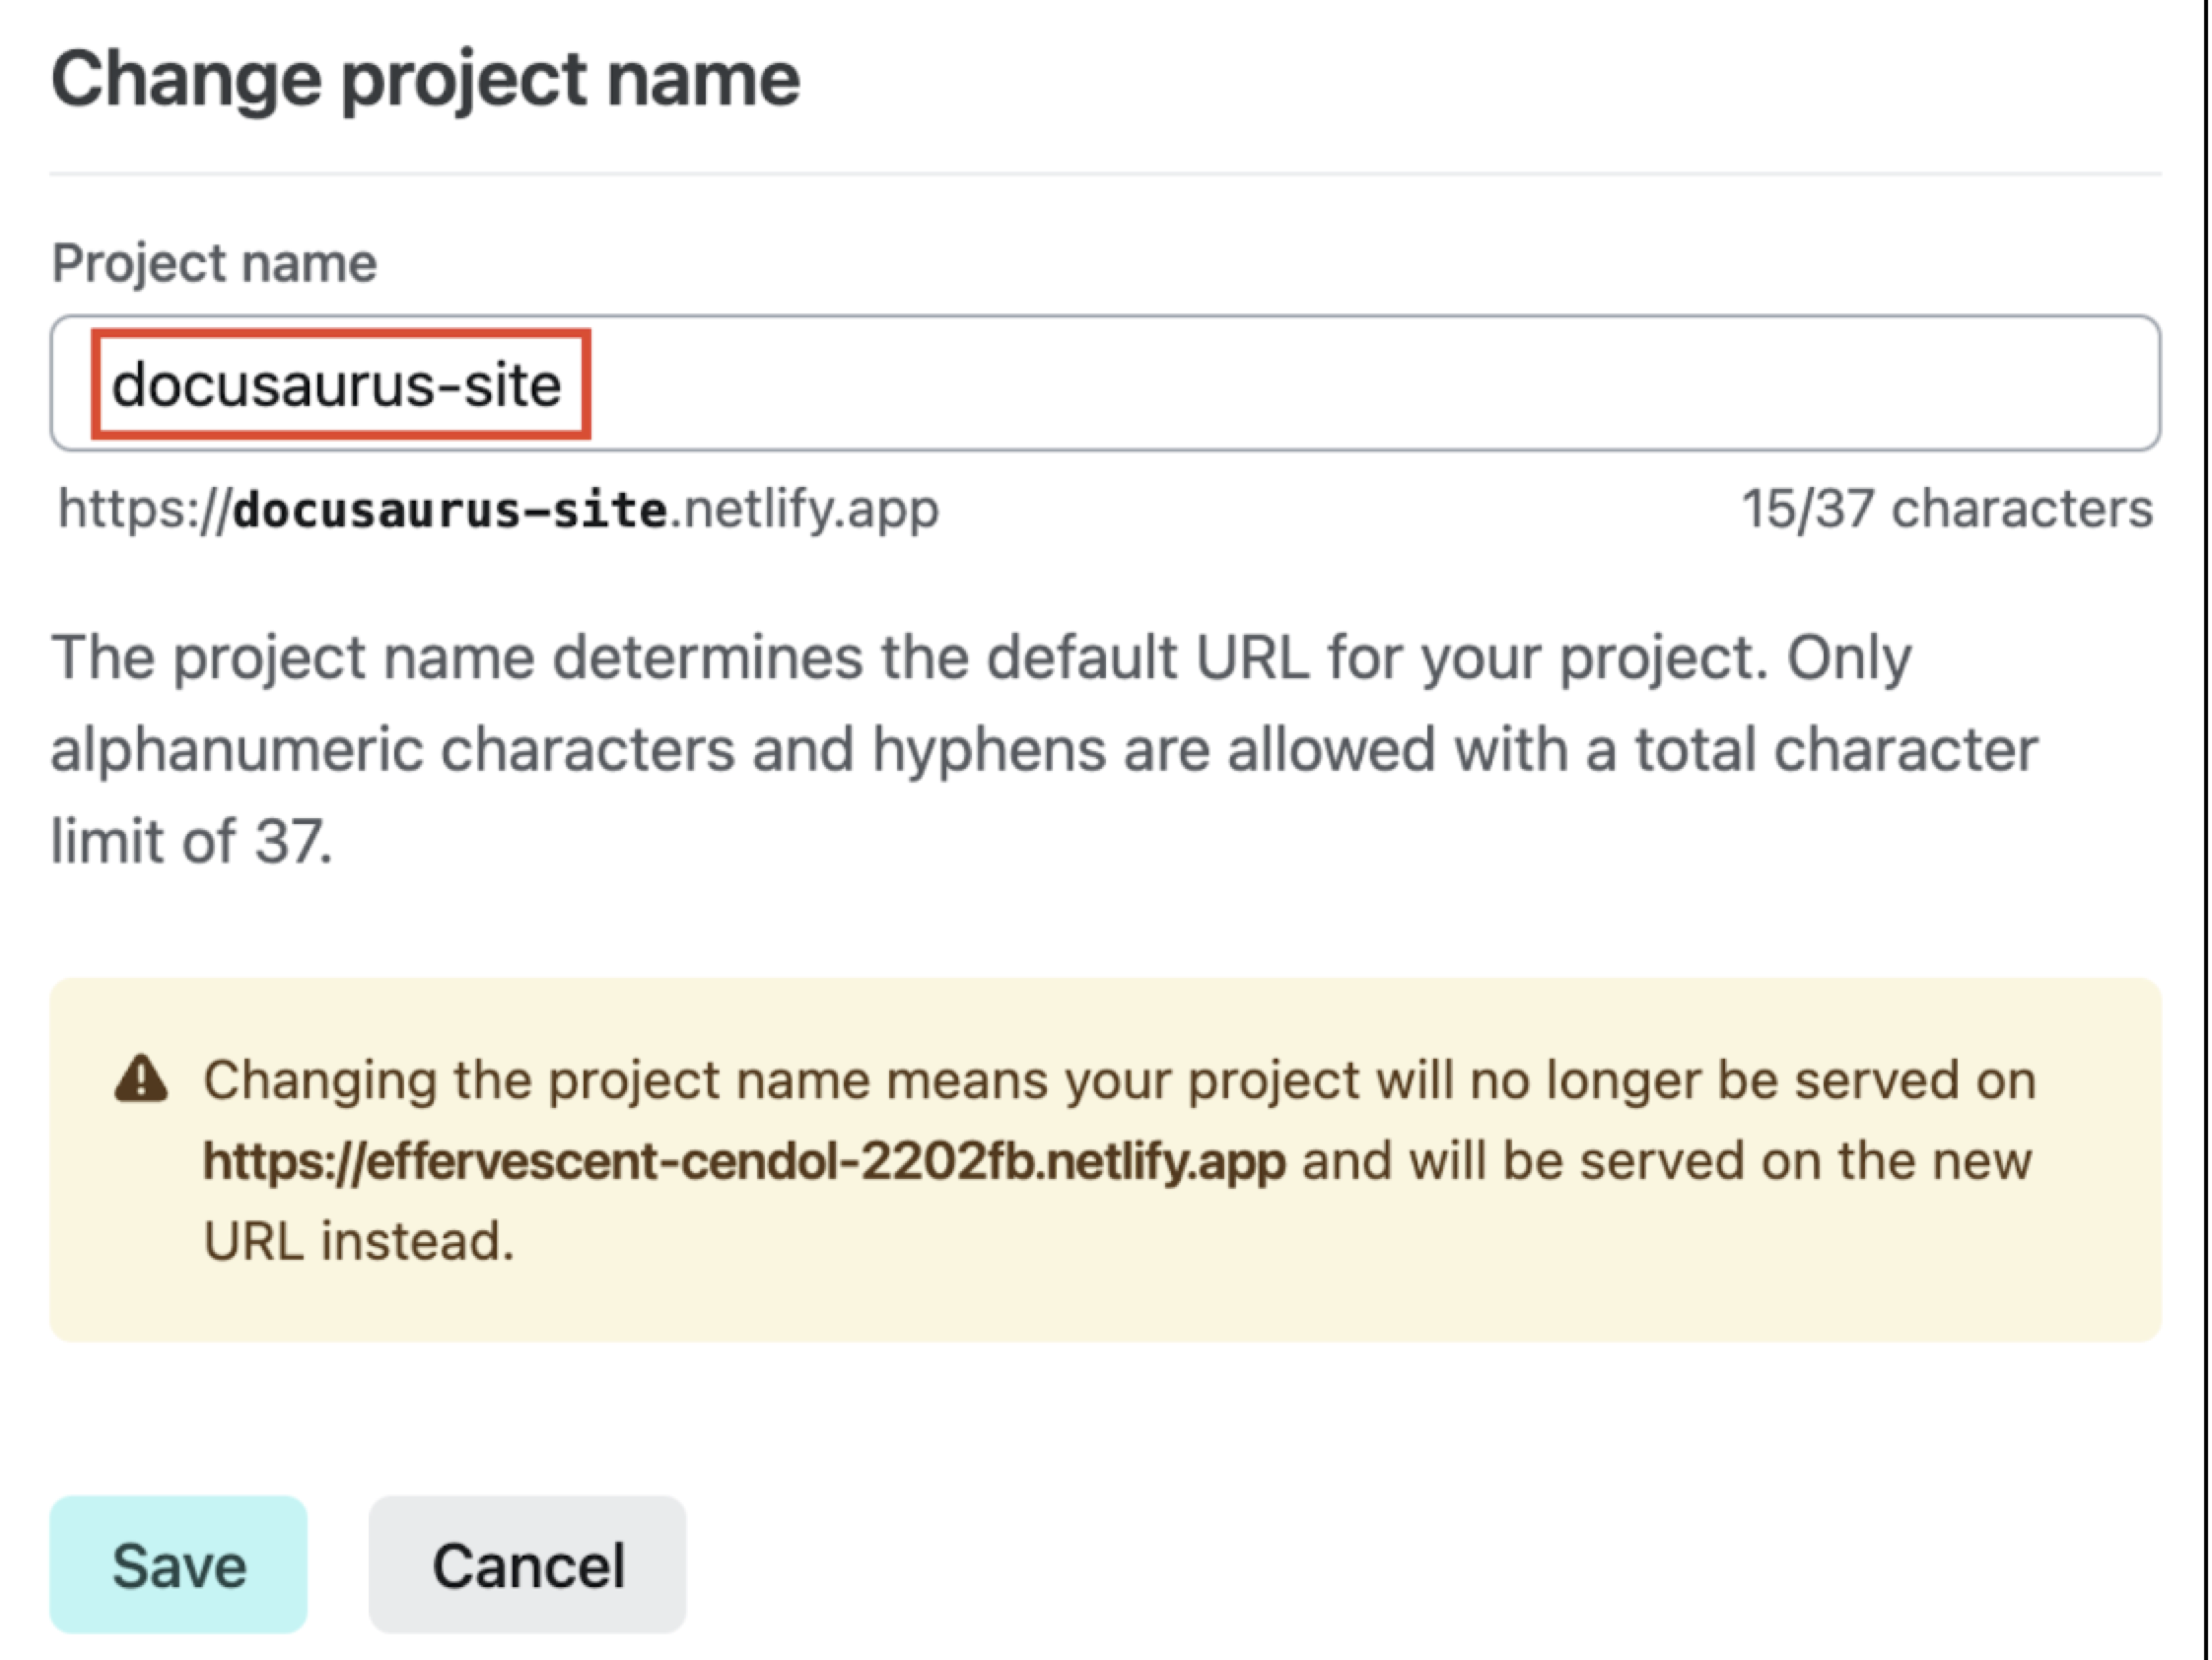
Click Options and select Edit project name under the Production domains section.
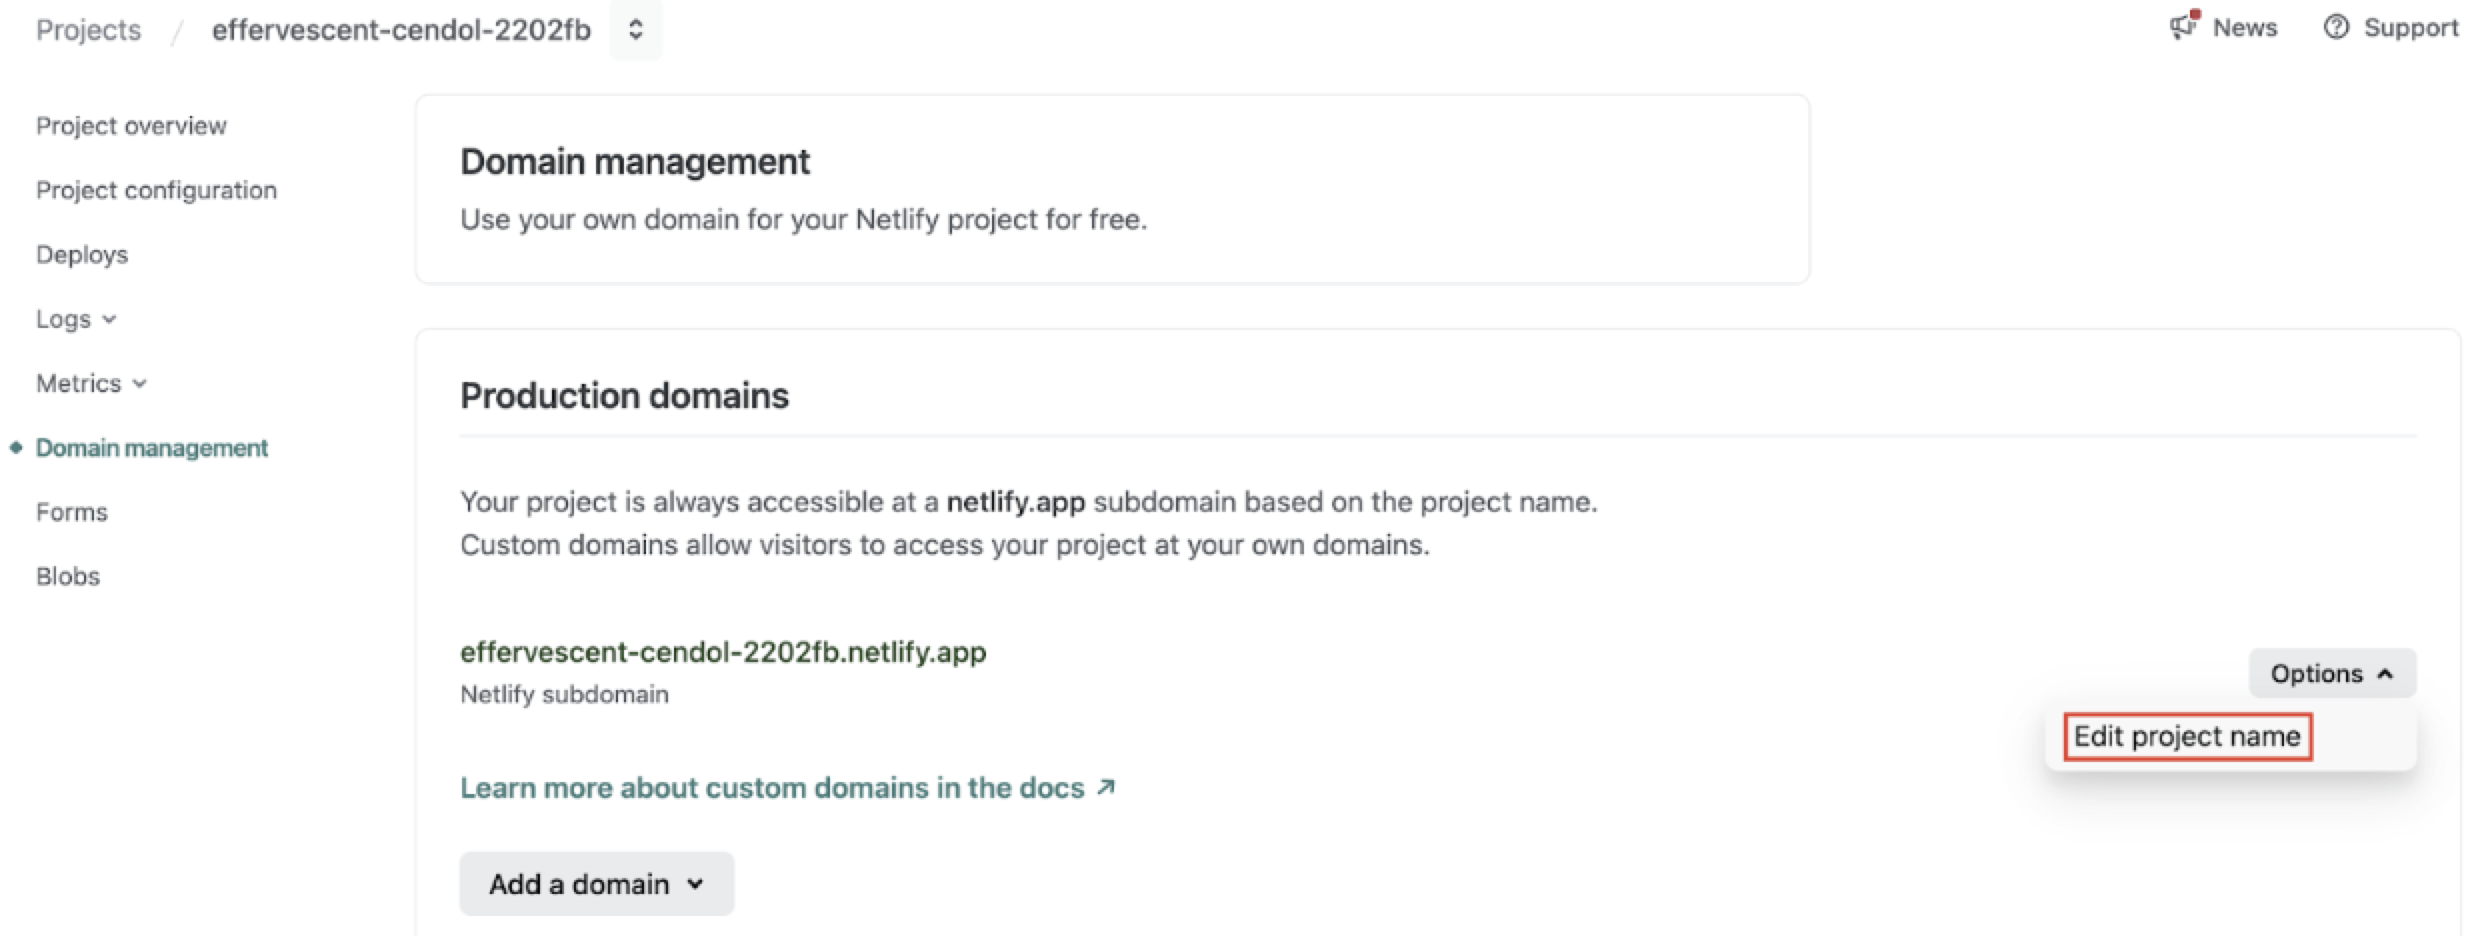
- Enter the new sub domain in the Project name field. In the following image, the sub domain is changed to docusaurus-site.
Since we are not changing the domain, it remains the same; netlify.app.
- Click Save.
To host your site on your own domain, you can find the configuration settings in the Production domains section itself. The process of configuring the domain is beyond the scope of this tutorial.
Deploy New Versions
When you make changes to your docs locally (on your device), you need to create a new build and upload the latest build folder to Netlify. The process is as follows.
-
Log in to Netlify.
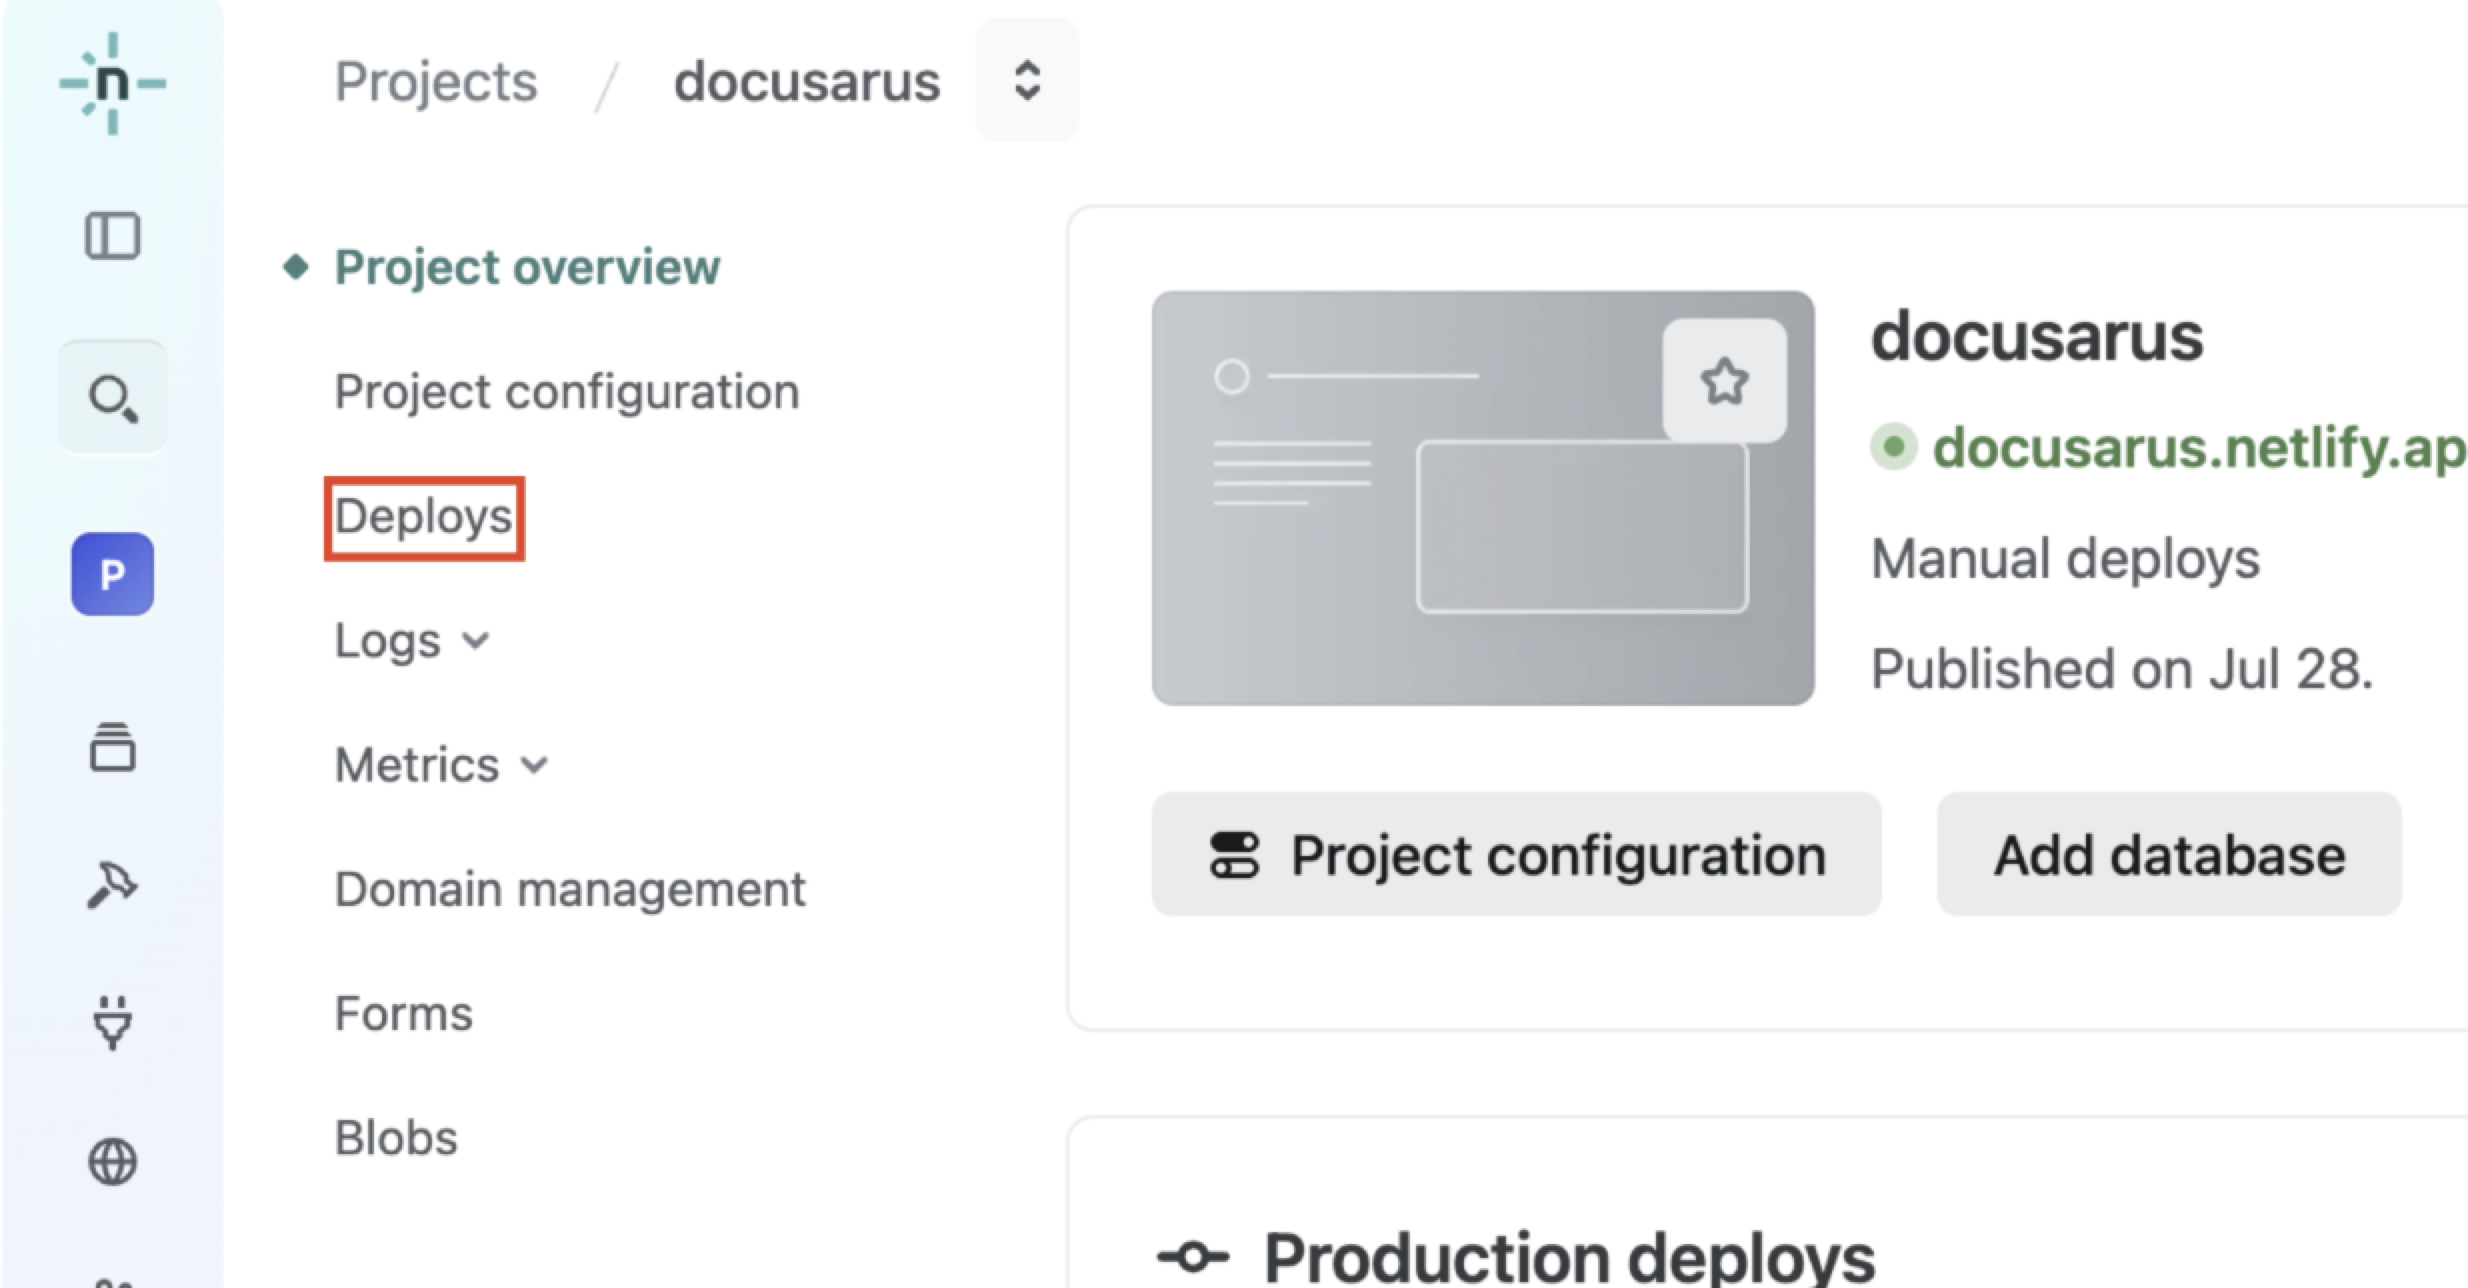
-
Click Deploys from the left menu.
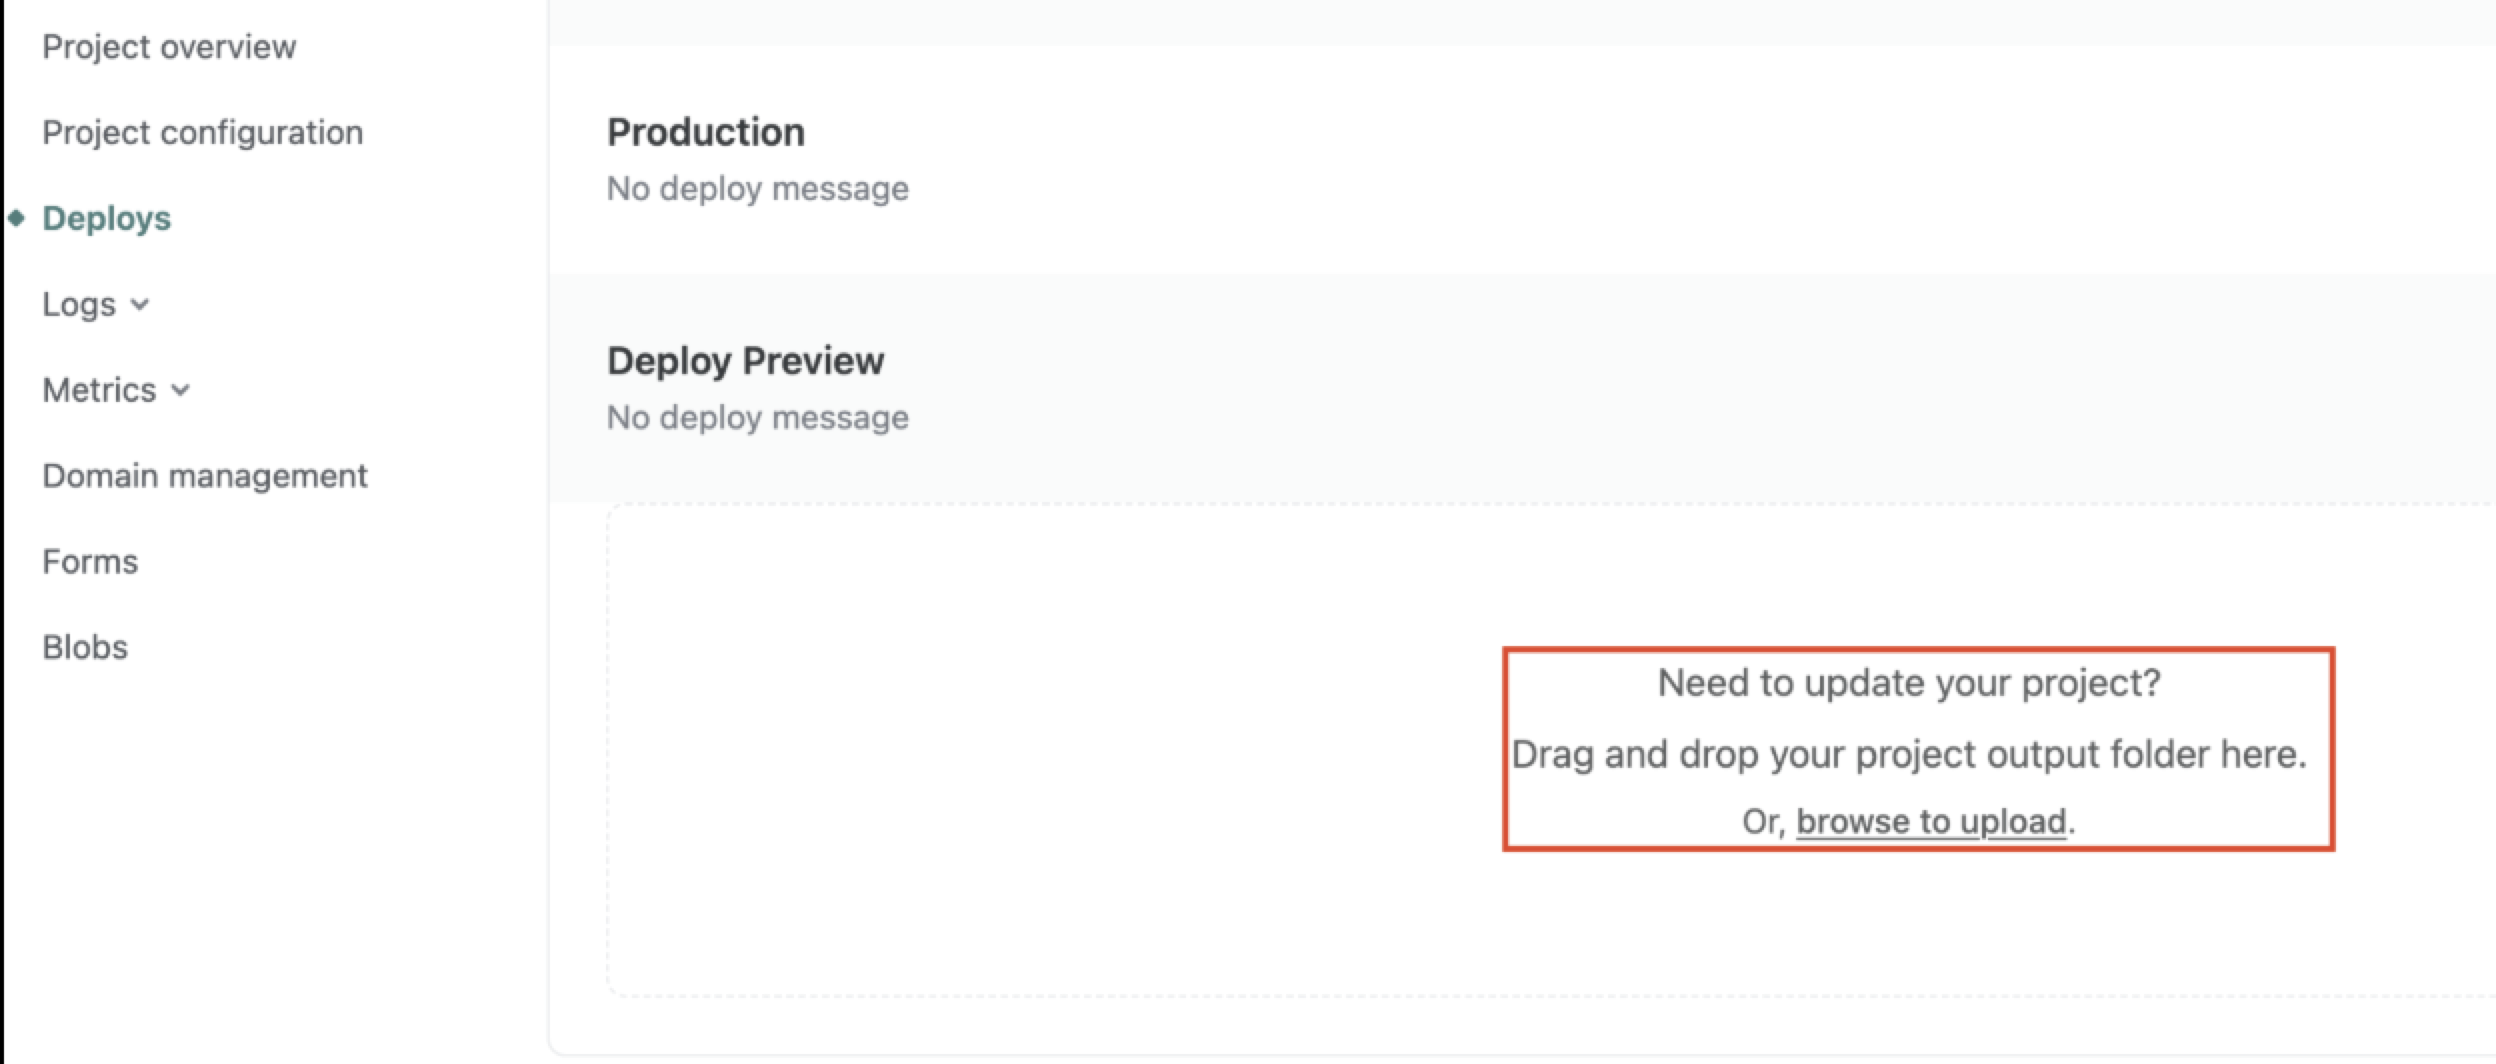
- Scroll down and click browse to upload and upload your build folder or directly drag and drop your build folder.
You can view the history of all your build uploads under the Deploys section.
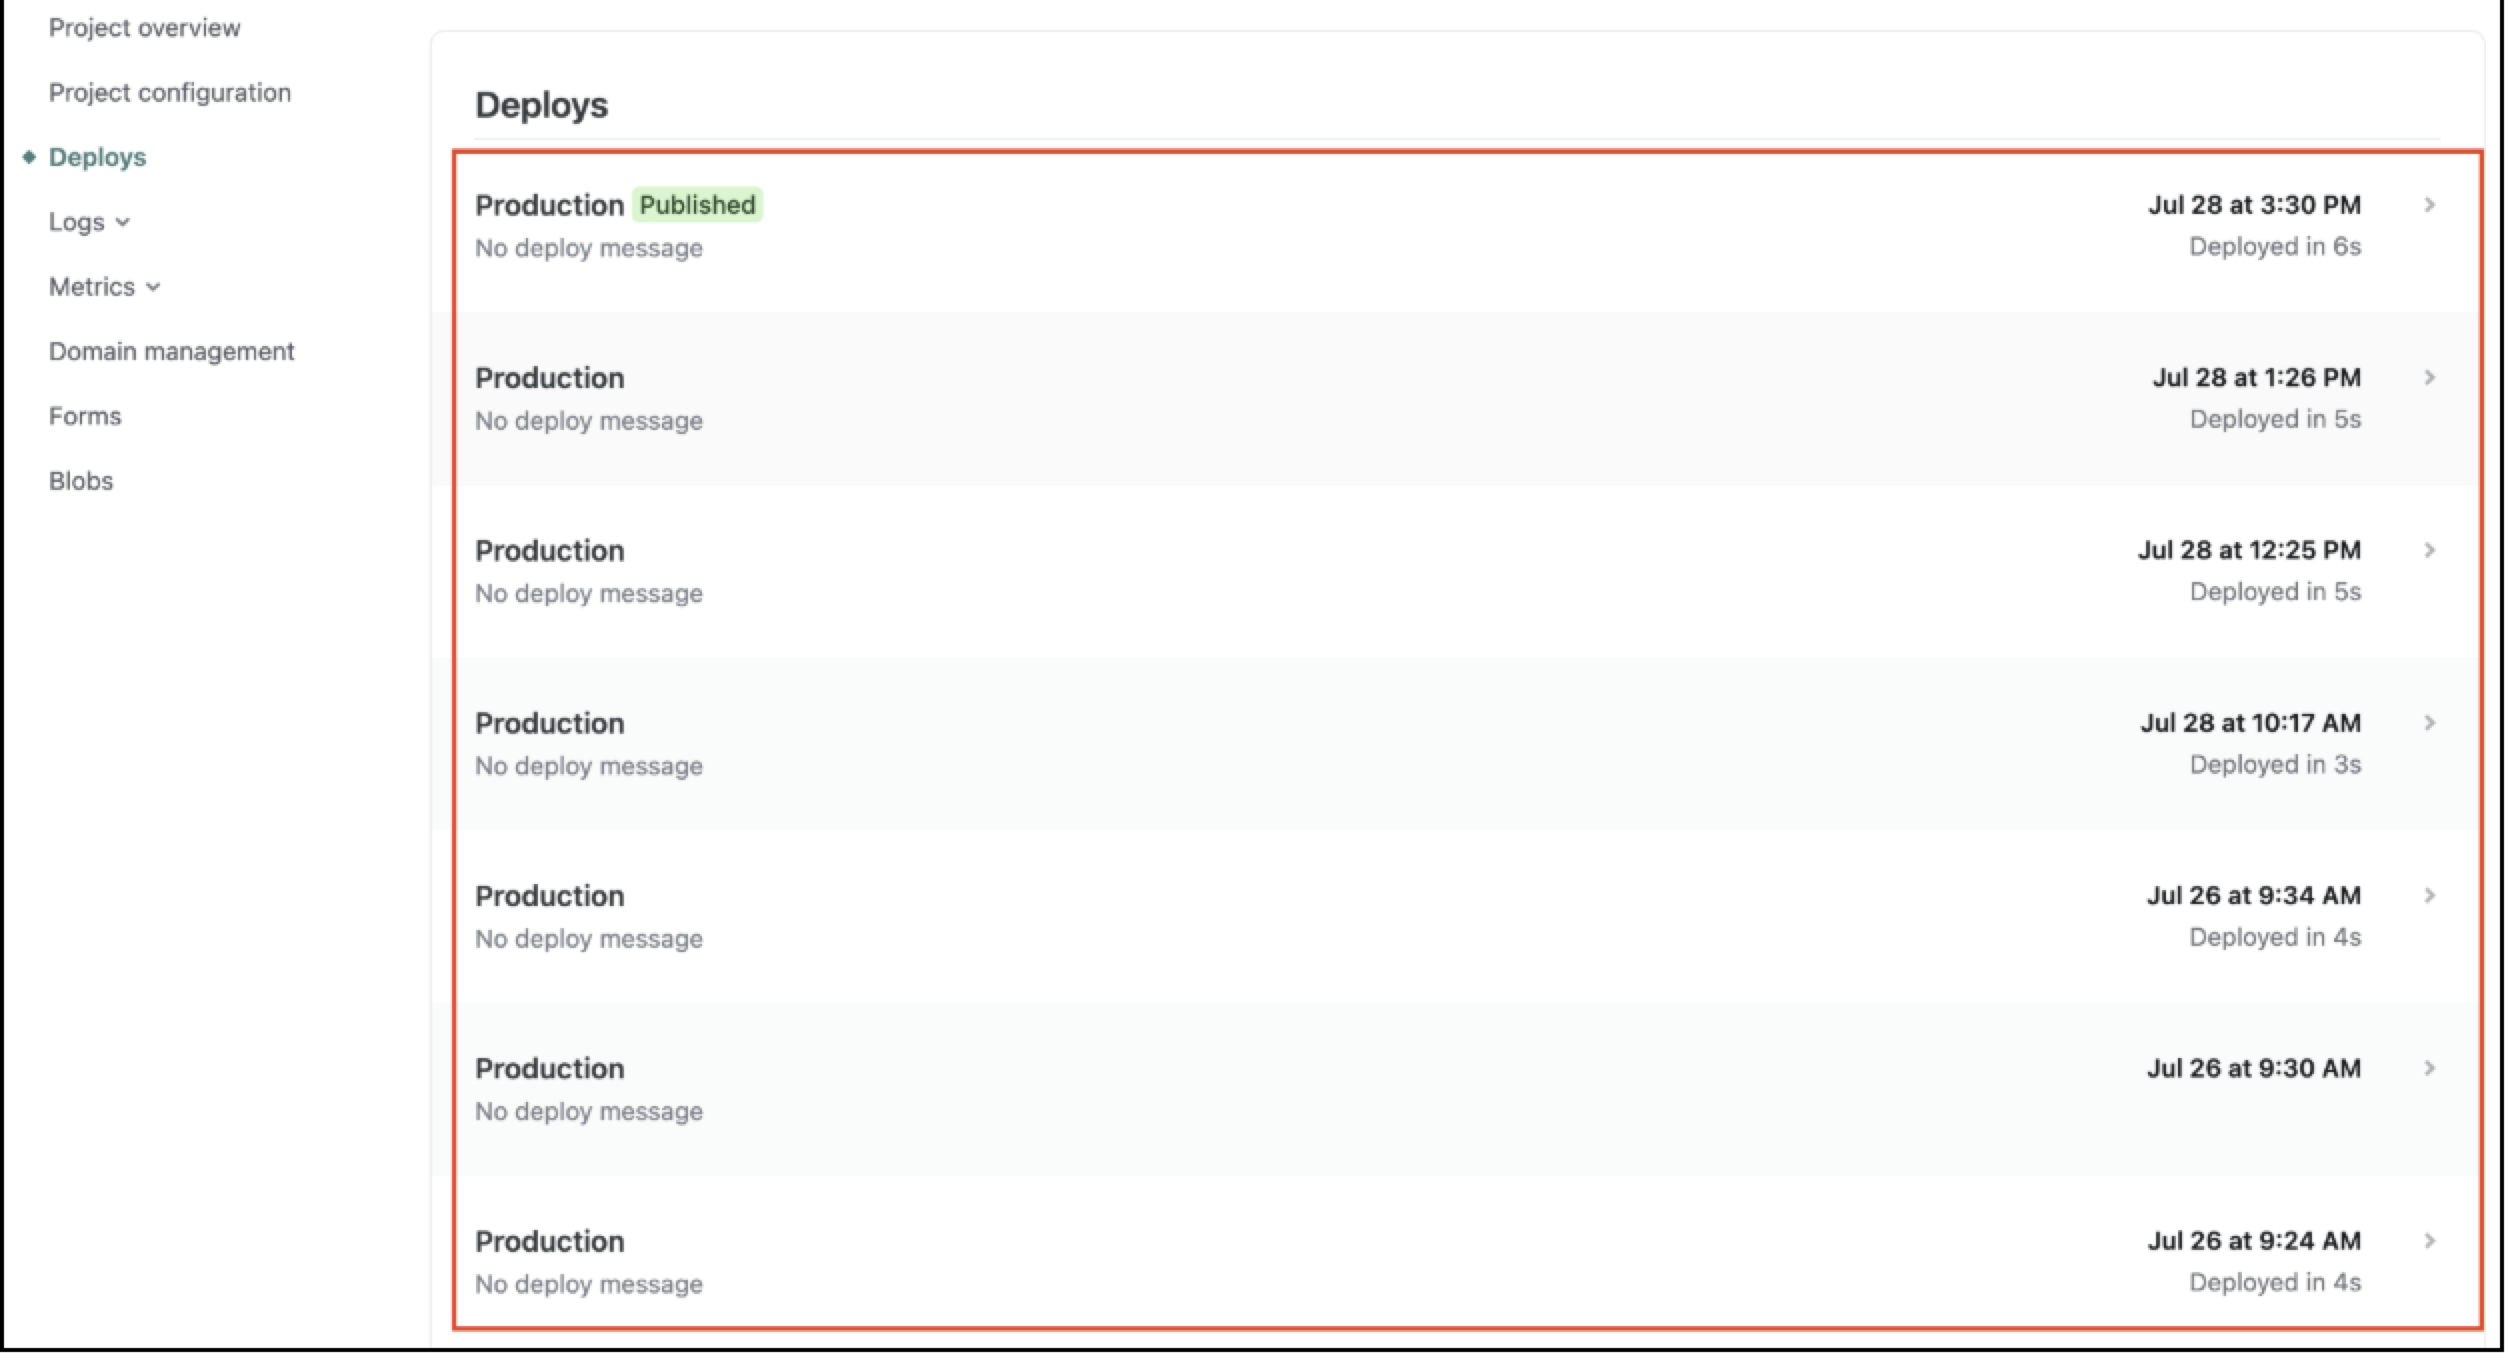
You can click any entry to view/download the content present in that version, for analysis.