Implement Authentication in Docusaurus Site
Once you have set up your Docusaurus page and configured all the settings, you can add authentication to ensure that only logged in users can view your content. In this section, let’s explore how we can add authentication mechanism to our Docusaurus site.
Firebase
Firebase is a Google platform which predominantly focuses on app development. However, since app development is Firebase’s primary motto, authentication takes a backseat and offers a pretty generous free tier. With Firebase authentication, you can setup login for your Docusaurus site. The free tier offers you up to 10000 MAUs (monthly active users). To top it all, Firebase supports third party login as well with Google and other popular platforms supported.
Create Firebase Project
You can sign in to Firebase using a Google account. As an admin in Firebase, it is mandatory to use a Google account to sign in. The steps to configure a Firebase account, project and app are as follows.
-
Sign in to the Firebase console with a Google account.
-
Click Get Started with a Firebase project.

-
Enter a name for your project (Docusaurus Login) in this case.
-
Accept the Firebase terms.
-
(Optional) Turn off the toggle switch prompting you to join the Google Developer Program.
-
Click Continue.

-
(Optional) Turn off the Gemini enablement toggle switch.
-
Click Continue.
-
(Optional) Turn off the Google Analytics tracking. I would strongly recommend you to keep this enabled. The next chapter that talks about enabling analytics in Docusaurus site requires this setting to be enabled.
Steps 10 and 11 are applicable only if you enabled Google Analytics in the above step.
-
Select your location from the Analytics Location drop-down menu.
-
Accept the Google Analytics Terms.
-
Click Create Project.

- Click Continue once the project is ready.

Create Firebase App
After creating a Firebase project, you must create an app. The steps are described as follows.
- Click the gear icon next to Project Overview and select Project Settings.

- Scroll down to the Your apps section and select web app.

-
Enter a name for your web app in the App nickname field.
-
Enable Firebase hosting for your app.
-
Click Register app.

You can view some important terms like apikey, authDomain, and so on (blurred in the following image). Store these values securely. You need to enter them in the subsequent setup.

-
Click Next.
-
Click Next again
-
Click Continue to console.
Your app is created.
Enable Authentication
To enable the authentication service in your Firebase account execute the following steps.
-
Click Project Overview.
-
Scroll down and click Authentication.

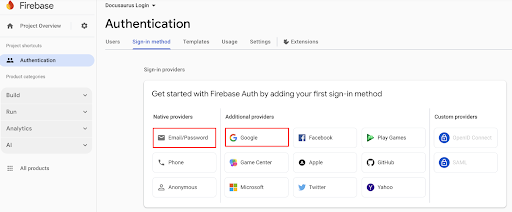
- Click Get Started.

-
Click Email/Password under Native providers. This enables email and password based authentication.
-
Enable Email/Password toggle switch and click Save.
You can enable any other authentication providers, as required. I have enabled Email/Password and Google based authentication.
The users who sign in or sign up to your site are automatically added to your authentication database. You can view the list of users under the Users tab. You can also manually add users on the Users tab.
Setting Up Docusaurus
- Execute the following command.
npm install firebase
- Create a file called
firebase.jsin thesrcfolder with following code.
Replace the values of variables apikey, authDomain, projectID, and appID with your Firebase details.
import { initializeApp } from 'firebase/app';
import { getAuth } from 'firebase/auth';

const firebaseConfig = {
  apiKey: 'Your_Firebase_API_key',
  authDomain: 'Your_Firebase_auth_domain',
  projectId: 'Your_Firebase_project_id',
  appId: 'Your_Firebase_app_id',
};

const app = initializeApp(firebaseConfig);
const auth = getAuth(app);

export { auth };
- Create a file called
login.jsin thesrc/pagesfolder with following code.
import React, { useState } from 'react';
import firebase from 'firebase/compat/app';
import 'firebase/compat/auth';

// Initialize Firebase (only once)
if (!firebase.apps.length) {
  firebase.initializeApp({
    apiKey: "AIzaSyDtOv9I1sOicXIv_s4OhQGMGsaBLTj-l_s",
    authDomain: "docusaurus-login-2ad68.firebaseapp.com",
    projectId: "docusaurus-login-2ad68",
    appId: "1:59091150143:web:4e951da93ae4a1b3371f8a"
  });
}

const provider = new firebase.auth.GoogleAuthProvider();

export default function Login() {
  const [isSignUp, setIsSignUp] = useState(false);
  const [email, setEmail] = useState('');
  const [password, setPassword] = useState('');
  const [message, setMessage] = useState('');

  const toggleForm = () => {
    setIsSignUp(!isSignUp);
    setMessage('');
    setEmail('');
    setPassword('');
  };

  const handleGoogleSignIn = () => {
    firebase.auth().signInWithPopup(provider)
      .then(result => {
        const user = result.user;
        setMessage(`Logged in as ${user.displayName}`);
        // Redirect after successful login
        window.location.href = '/your-doc-page'; // <-- Change this to your doc URL
      })
      .catch(error => {
        setMessage(`Google Sign-In error: ${error.message}`);
      });
  };

  const handleEmailAuth = (e) => {
    e.preventDefault();
    if (isSignUp) {
      firebase.auth().createUserWithEmailAndPassword(email, password)
        .then(userCredential => {
          setMessage(` Account created for ${userCredential.user.email}`);
          // Redirect after signup
          window.location.href = '/your-doc-page'; // <-- Change this
        })
        .catch(error => {
          setMessage(`Sign Up error: ${error.message}`);
        });
    } else {
      firebase.auth().signInWithEmailAndPassword(email, password)
        .then(userCredential => {
          setMessage(`Logged in as ${userCredential.user.email}`);
          // Redirect after login
          window.location.href = 'chapter-1-introduction'; // <-- Change this
        })
        .catch(error => {
          setMessage(`Sign In error: ${error.message}`);
        });
    }
  };

  return (
    <div style={{
      maxWidth: '400px',
      margin: '3rem auto',
      padding: '2rem',
      border: '1px solid #ccc',
      borderRadius: '8px'
    }}>
      <h2>{isSignUp ? 'Sign Up' : 'Login'}</h2>

      <form onSubmit={handleEmailAuth}>
        <input
          type="email"
          placeholder="Email"
          value={email}
          onChange={(e) => setEmail(e.target.value)}
          required
          style={{ width: '100%', padding: '8px', margin: '8px 0' }}
        />
        <input
          type="password"
          placeholder="Password"
          value={password}
          onChange={(e) => setPassword(e.target.value)}
          required
          style={{ width: '100%', padding: '8px', margin: '8px 0' }}
        />
        <button type="submit" style={{ padding: '10px 15px', marginTop: '10px' }}>
          {isSignUp ? 'Sign Up' : 'Login'}
        </button>
      </form>

      <button
        onClick={handleGoogleSignIn}
        style={{ marginTop: '15px', padding: '10px 15px' }}
      >
        Sign in with Google
      </button>

      <p style={{ marginTop: '15px' }}>
        {isSignUp ? 'Already have an account?' : "Don't have an account?"}
        <button
          onClick={toggleForm}
          style={{
            marginLeft: '5px',
            background: 'none',
            border: 'none',
            color: 'blue',
            cursor: 'pointer',
            textDecoration: 'underline',
            padding: 0,
          }}
        >
          {isSignUp ? 'Login' : 'Sign Up'}
        </button>
      </p>

      {message && <p style={{ marginTop: '15px' }}>{message}</p>}
    </div>
  );
}
- Update the
index,jsfile with the following code
import React, { useEffect, useState } from 'react';
import Layout from '@theme/Layout';
import TutorialTile from '../components/TutorialTile';
import styles from './index.module.css';
import firebase from 'firebase/compat/app';
import 'firebase/compat/auth';

// Firebase config — keep this here if not initialized elsewhere
if (!firebase.apps.length) {
  firebase.initializeApp({
    apiKey: "AIzaSyDtOv9I1sOicXIv_s4OhQGMGsaBLTj-l_s",
    authDomain: "docusaurus-login-2ad68.firebaseapp.com",
    projectId: "docusaurus-login-2ad68",
    appId: "1:59091150143:web:4e951da93ae4a1b3371f8a"
  });
}

export default function Home() {
  const [checkingAuth, setCheckingAuth] = useState(true);
  const [user, setUser] = useState(null);

  useEffect(() => {
    const unsubscribe = firebase.auth().onAuthStateChanged(u => {
      if (u) {
        setUser(u);
      } else {
        window.location.href = '/login'; // 👈 redirect to login
      }
      setCheckingAuth(false);
    });
    return () => unsubscribe();
  }, []);

  if (checkingAuth) return <p>Loading...</p>;

  return (
    <Layout title="Tutorial Hub" description="A collection of tutorials">
      <main className={styles.main}>
        <h1 className={styles.heading}>Docusaurus Tutorials</h1>
        <div className={styles.tiles}>
          <TutorialTile
            title="Getting Started with Docusaurus"
            description="Learn the fundamentals of Docusaurus."
            link="/chapter-1-introduction"
          />
        </div>
      </main>
    </Layout>
  );
}
- Run
localhost:3000
Apply Sitewide Authentication
The above setup ensures that your site homepage is opened only after users log in. However, if a user has the exact URL of any other page in your site, they can still access your site using the URL, with logging in. To ensure the pages of your site are covered by authentication, you must perform the actions described in this section.
-
In the
srcfolder, create a folder calledtheme. -
In the
themefolder create aRoot.jsfile (ensure that file name isRoot.jsand notroot.js). -
Add the following code to the
Root.jsfile.
Replace values of variables like apikey, authDomain, and so on with your Firebase details.
import React, { useEffect, useState } from 'react';
import firebase from 'firebase/compat/app';
import 'firebase/compat/auth';
import { useLocation, useHistory } from '@docusaurus/router';

if (!firebase.apps.length) {
  firebase.initializeApp({
    apiKey: "Your_Firebase_API_Key",
    authDomain: "Your_Firebase_auth_domain",
    projectId: "Your_Firebase_project_id",
    appId: "Your_firebase_app_id"
  });
}

export default function Root({ children }) {
  const [checkingAuth, setCheckingAuth] = useState(true);
  const [user, setUser] = useState(null);
  const location = useLocation();
  const history = useHistory();

  useEffect(() => {
    const unsubscribe = firebase.auth().onAuthStateChanged((firebaseUser) => {
      setUser(firebaseUser);
      setCheckingAuth(false);
    });

    return () => unsubscribe();
  }, []);

  useEffect(() => {
    if (!checkingAuth && !user && location.pathname !== '/login') {
      history.push(`/login?redirect=${location.pathname}`);
    }
  }, [checkingAuth, user, location]);

  if (checkingAuth) return null; // or a loader

  return <>{children}</>;
}
Now your entire site is covered and comes under the authentication blanket.
I have not applied authentication on this tutorial site. However, if you wish to check out how authentication screen looks, you can navigate to this link.